• Skip to primary navigation
  • Skip to main content
  • Skip to primary sidebar
  • Skip to footer
  • Home
  • Free Course
  • Keto Calculator

KETOGASM logo

  • Keto Recipes
  • About
    • Disclaimer
    • Privacy Policy
  • Meal Plan
  • Podcast
menu icon
go to homepage
search icon
Homepage link
  • Keto Recipes
  • About
  • Book
  • Meal Plan
  • Podcast
  • Contact
  • Disclaimer
  • Privacy Policy
    • Facebook
    • Instagram
    • Pinterest
    • Twitter
  • ×

    Home » Posts

    Posts

    Keto Almond Flour Pancakes without Cream Cheese

    June 28, 2021

    Stack of almond flour pancakes on plate with strawberry in background.

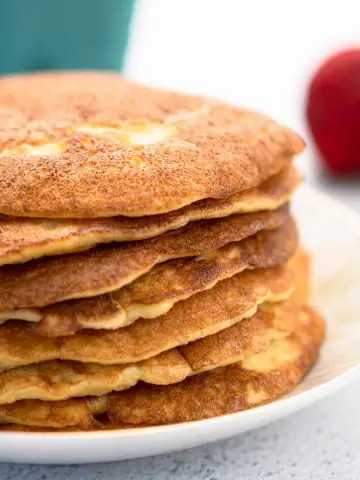
    Craving light, pillowy pancakes but struggling to find a satisfying low-carb version? Then you are going to love these fluffy keto almond flour pancakes. These healthy hotcakes are the real deal, and many people have shared they prefer these to the traditional high-carb versions. Since these keto pancakes are made without cream cheese or protein powder, they really taste like everyone's favorite breakfast food instead of just looking like it. 

    These are hands down the best keto pancakes I've ever tried, and the recipe has been tweaked to perfection over the years. They are fluffy, delicious, and easy to make – and flip! Plus, they're a real crowd-pleaser, passing the taste test for kids and picky eaters alike. I rarely hype a recipe this much, but trust me on this one. 

    The recipe is modeled after my favorite sweet cream pancakes from my pre-keto days. Heavy cream, keto-friendly sweetener, and vanilla are used to recreate the classic flavors. Egg whites, yolks, almond flour, and baking powder complete the pancake batter. These pancakes are sweet, but you can definitely go the savory route with the base recipe if preferred. 

    You can scale the recipe up or down, making keto pancakes for one or for the whole family. The recipe can also be made ahead and frozen for a quick meal prep time-saver. 

    This recipe was originally published on November 4, 2017, but has been updated with new photos, video, clarified instructions, and answers to frequently asked questions, including ingredient unit conversions and recipe adaptations.

    [feast_advanced_jump_to]

    🥘 Ingredients

    • Almond flour
    • Large eggs
    • Heavy cream
    • Baking powder
    • Salt
    • Erythritol
    • Vanilla extract

    Almond flour: For best results, use super-fine blanched almond flour. The skins are removed from the almond with blanched almond flour, making a lightweight flour perfect for baking and fluffy pancake creations. Unblanched almond flour is a bit heavier but will work in the recipe if that’s all you have on hand. Similarly, almond meal can work in a pinch, but it is heavy with a coarse texture that weighs down the batter and makes the resulting pancakes denser.

    Large eggs: Use whole large eggs to ensure plenty of egg whites to beat into a fluffy mixture. Smaller eggs produce less batter, which results in fewer pancakes.

    Heavy cream: Heavy cream or heavy whipping cream can be used interchangeably in the recipe. You can also whip some up to use as a topping!

    Ingredients to make the recipe: heavy cream, salt, almond flour, baking powder, vanilla extract, erythritol, eggs, and butter.

    👩‍🍳 How to Make

    White keto baking mixes are becoming more popular, going the DIY route and making keto pancakes from scratch is easier than you might think.

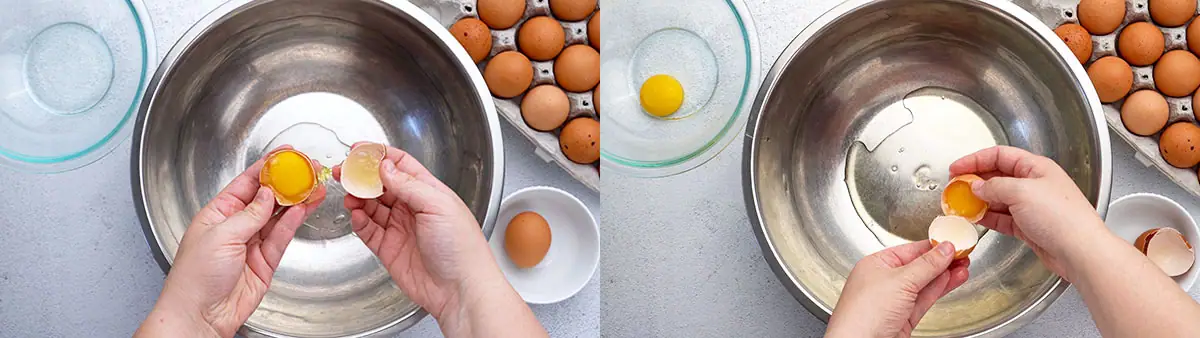
    Step 1: Separate the egg whites from the yolk.

    Crack the eggs open over a bowl and catch the egg whites in it, using your hands, eggshell halves, or slotted spoon to hold the yolk. 

    Put egg yolks in a separate bowl. 

    Pay special attention to keep the yolk intact to prevent mixing the fatty yolks with the high-protein egg whites. Yolk in the egg whites can prevent them from forming soft peaks when beaten.

    Step by step separating egg yolk from egg white into bowls.

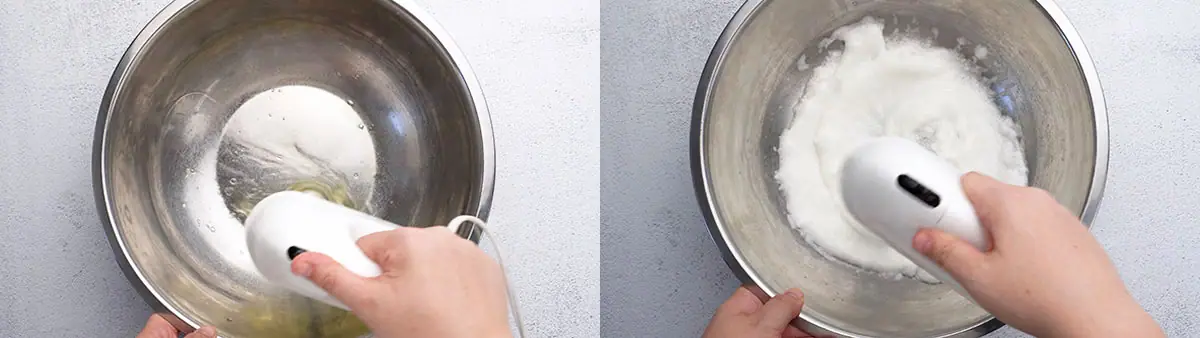
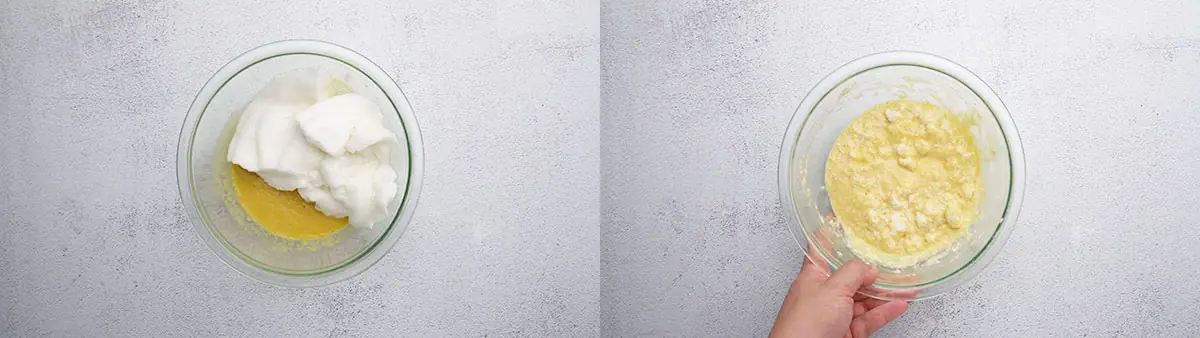
    Step 2: Beat the egg whites.

    Use an electric mixer to beat egg whites until soft peaks form. This is the secret to fluffy keto pancakes!

    As the mixer runs, the texture will change from runny liquid to loose bubbles to a soft foam that holds its shape in roughly three minutes.

    Once you reach soft peaks, turn the mixer off and set the beaten egg whites aside. 

    Option: You can continue mixing until stiff peaks form if preferred, though it will add several minutes to the prep time. Doing this can add more body and firmness to the pancakes, though they can be a tad drier.

    Hand holding electric hand-mixer in stainless steel bowl to beat egg whites.

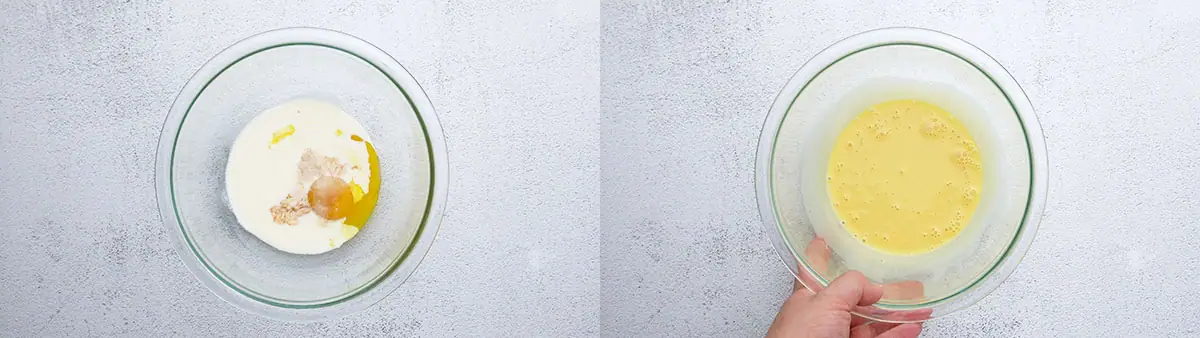
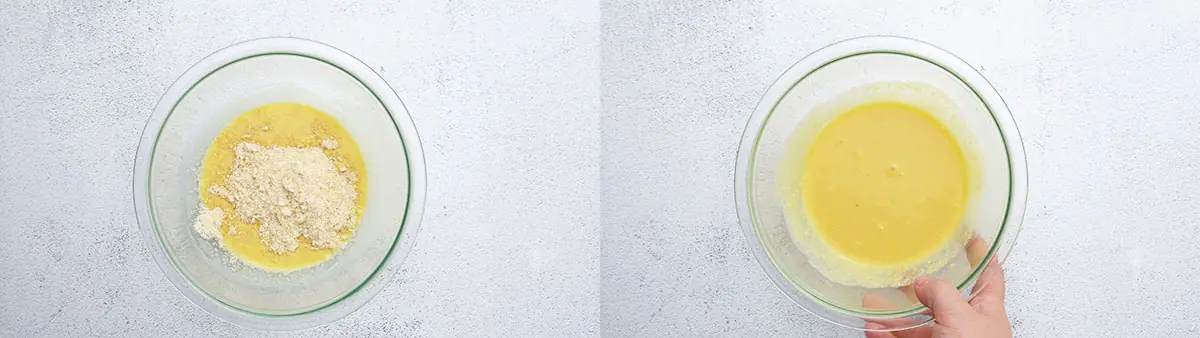
    Step 3: Add liquid ingredients, sweetener, and salt to egg yolks.

    Pour heavy cream, erythritol, and vanilla extract into the bowl with egg yolks. Add a pinch of salt, then whisk or blend until the mixture is smooth.

    Batter ingredients in bowl unmixed on left, then shown blended while on right-hand side.

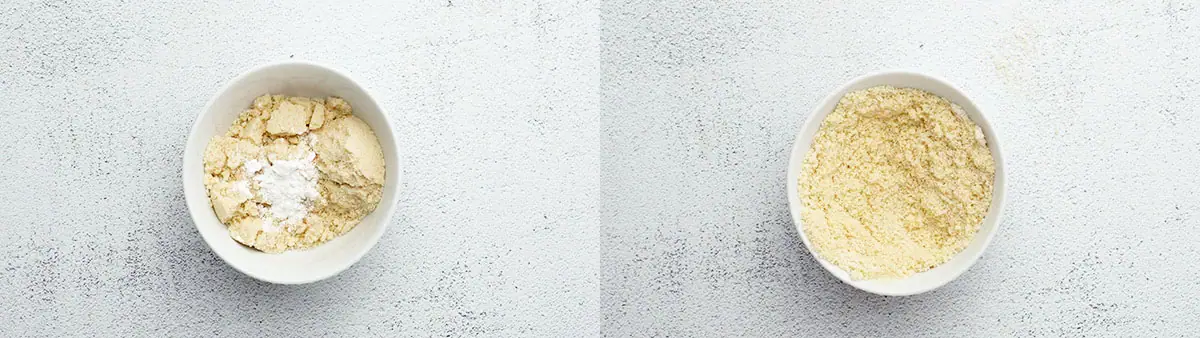
    Step 4: Combine dry ingredients.

    Mix together 2 ounces of almond flour (dry weight) with baking powder. Using measuring cups, this equates to approximately ⅓ cup of tightly packed almond flour or ½ cup of loosely packed flour. 

    Pro tip: When in doubt, a kitchen scale is the most accurate.

    The best practice for nutrition calculation is by weight, which is presented in the nutrition label in the recipe card below.  

    Almond flour with baking powder in a small bowl.

    Step 5: Add dry ingredients to wet ingredients.

    Add the almond flour mixture to the yolk mixture, then whisk or blend until smooth. 

    Break up any clumps of flour while you mix and ensure ingredients are well combined.

    Dry almond flour mixture added to the wet yolk batter.

    Step 6: Fold egg whites into almond flour batter.

    Slowly incorporate the beaten egg whites into the liquid batter by gently lifting and scooping the ingredients together. 

    Folding the ingredients keeps the batter light and airy rather than liquid. Do not stir or overwork, or the batter will deflate.

    Remember, a liquidy batter equals less fluffy keto pancakes in this recipe. 

    The goal here is to combine the ingredients without losing all that luscious whipped texture you worked to achieve earlier.

    Egg whites folded into the almond flour egg yolk batter in a clear bowl.

    Step 7: Cook the pancakes.

    Heat a non-stick pan or skillet over medium heat. Grease the surface with butter or cooking oil of choice. 

    Use a paper towel to evenly spread butter and wipe up any excess. 

    For each pancake, scoop two tablespoons, or ⅛-cup (30mL), of the prepared batter onto the heated surface. 

    Use the back of the measuring spoon to spread the batter and shape it into 4-inch circles. 

    Before attempting to flip them, let each pancake cook for about two minutes or until the bottoms turn golden brown.

    If you try to flip the pancakes before they are ready, they may bunch up or fall apart during the flip. 

    To check if they are ready, wait until you see tiny bubbles forming along the edges. Then, gently lift the side with a spatula to peek at the bottom - if it's golden brown, go ahead and flip.

    If the bottom is pale, give it more time to cook. If it is dark brown or burnt, lower the temperature or shorten the cooking time.

    Once flipped, cook the pancakes until the other side becomes golden brown, about 1 to 2 minutes.

    Step-by-step process of cooking almond flour pancakes, including greasing the pan, spreading the batter, checking for doneness, and flipping.

    🍳 Cooking Tips

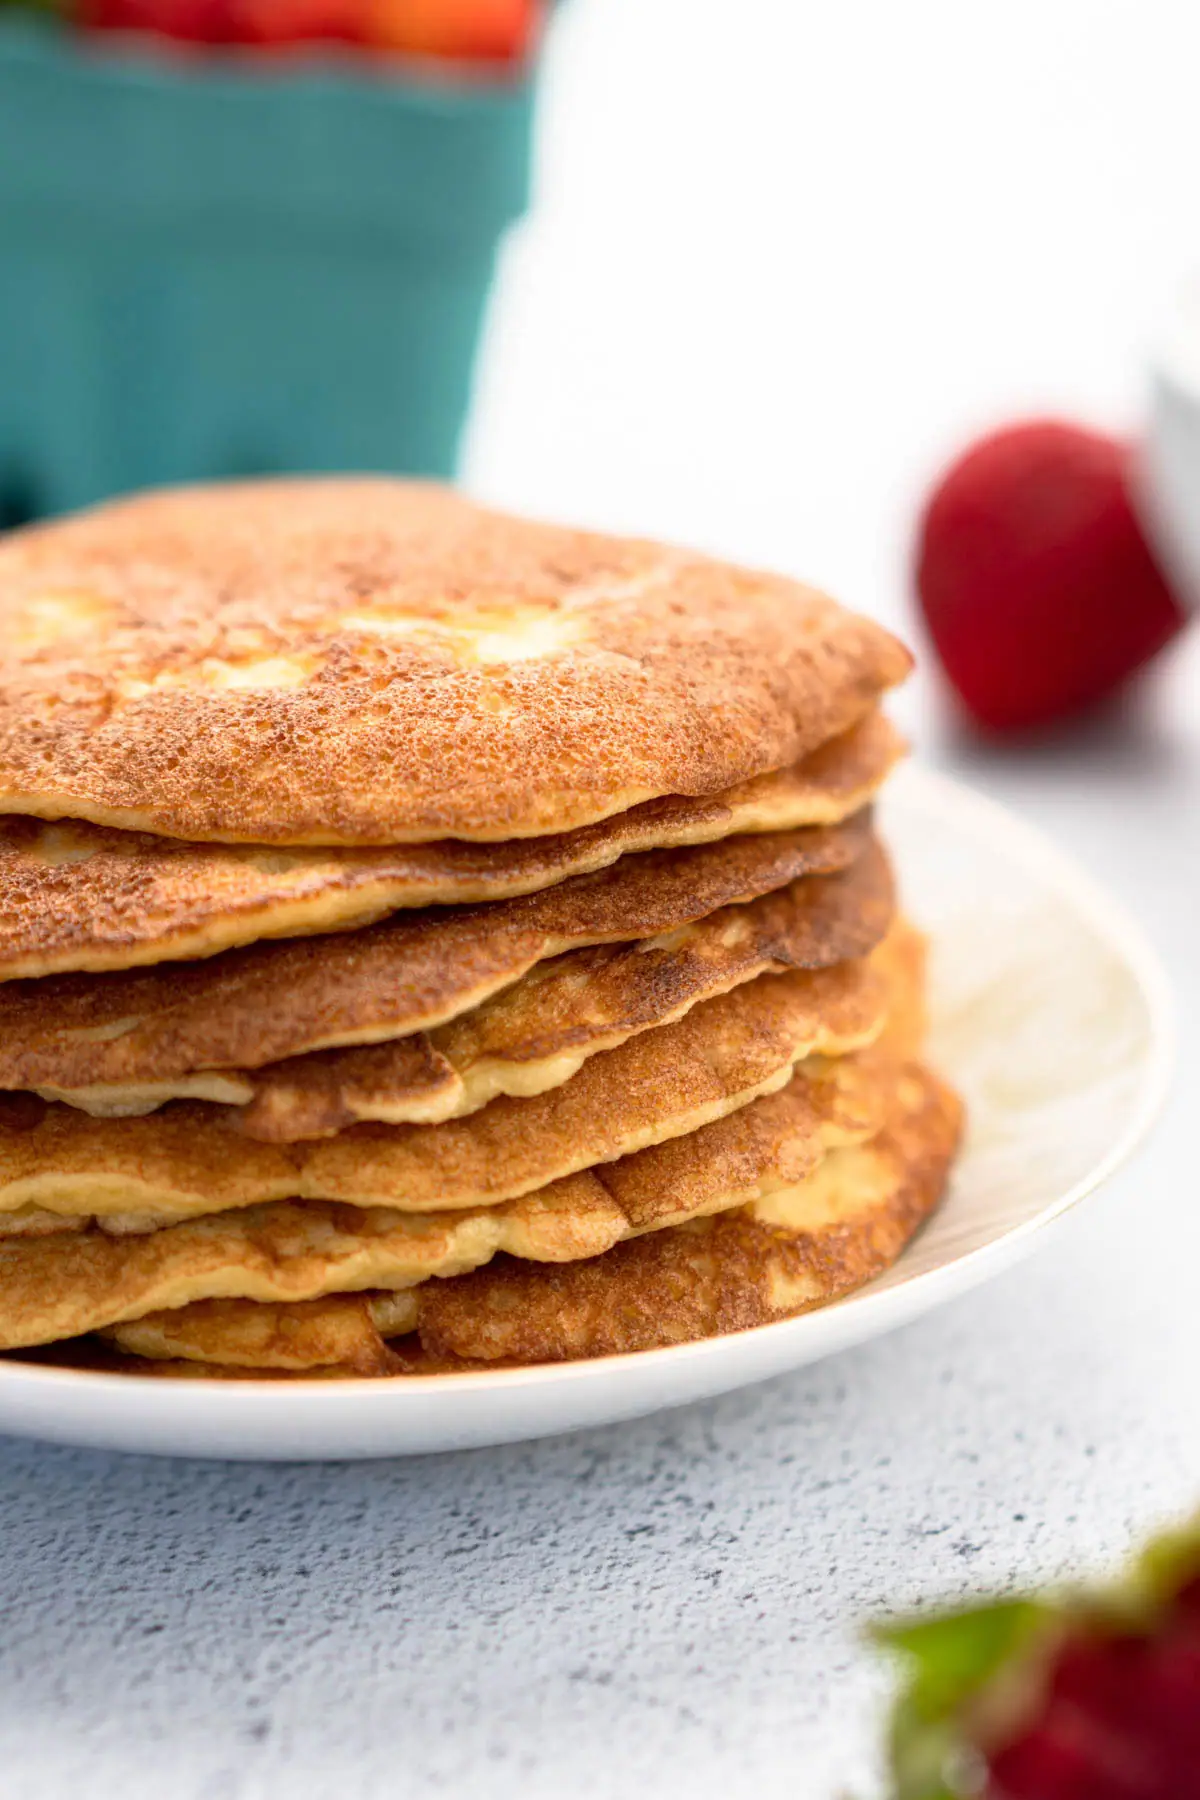
    Keeping the pancakes on the small side will make flipping easier. The recipe, as written (without scaling), makes eight 4-inch pancakes. 

    If you make adjustments to the size of the keto pancakes, the cooking time may also need to be adjusted. Again, look for the bubbles around the border and check the color of the bottom for best results when cooking times are increased for bigger pancakes or decreased for smaller sizes. 

    Pancakes stacked on a plate with fruit in the background.

    🍽️ Recipe Adaptations

    Different flours: If you're looking to substitute almond flour due to dietary restrictions or preference, coconut flour makes a good swap in this recipe. However, it is more absorbent, and a 1:1 ingredient switcheroo produces pancakes that are less moist and a bit on the dry side. If using coconut flour, reduce the amount to 1 ounce (dry weight) per batch, roughly ¼ cup. Hazelnut flour is also low in carbs and can be used as a substitute for almond flour for a fun new flavor profile.

    Switch up the extract: Vanilla is the most popular pancake flavoring. Still, you can add or swap different extracts for new flavor varieties. For example, an almond extract would enhance the natural almond flavor of the flour. In contrast, other extracts could complement the base recipe – cinnamon, coffee, maple, or banana extracts are a few ideas to consider.  

    Make it dairy-free: Need a keto pancake recipe without dairy? No problem. Swap out the heavy cream and butter with non-dairy options instead. I recommend using unsweetened coconut cream to replace the heavy cream for a similar fluffy texture. Other alternatives include unsweetened almond milk, coconut milk, or hemp milk to stand in for heavy cream. Use your preferred cooking oil to replace the butter, but choose something with a neutral flavor, so it doesn't overpower the pancakes–avocado oil or olive oil work well for this purpose. 

    Sweet or savory: The recipe calls for erythritol, but you can use your preferred sweetener of choice. Stevia, monk fruit, or allulose make suitable replacements for erythritol. However, their sweetness can vary dramatically, so adjust accordingly using a keto sweetener conversion tool. For savory pancakes, consider omitting the sweetener and vanilla extract.   

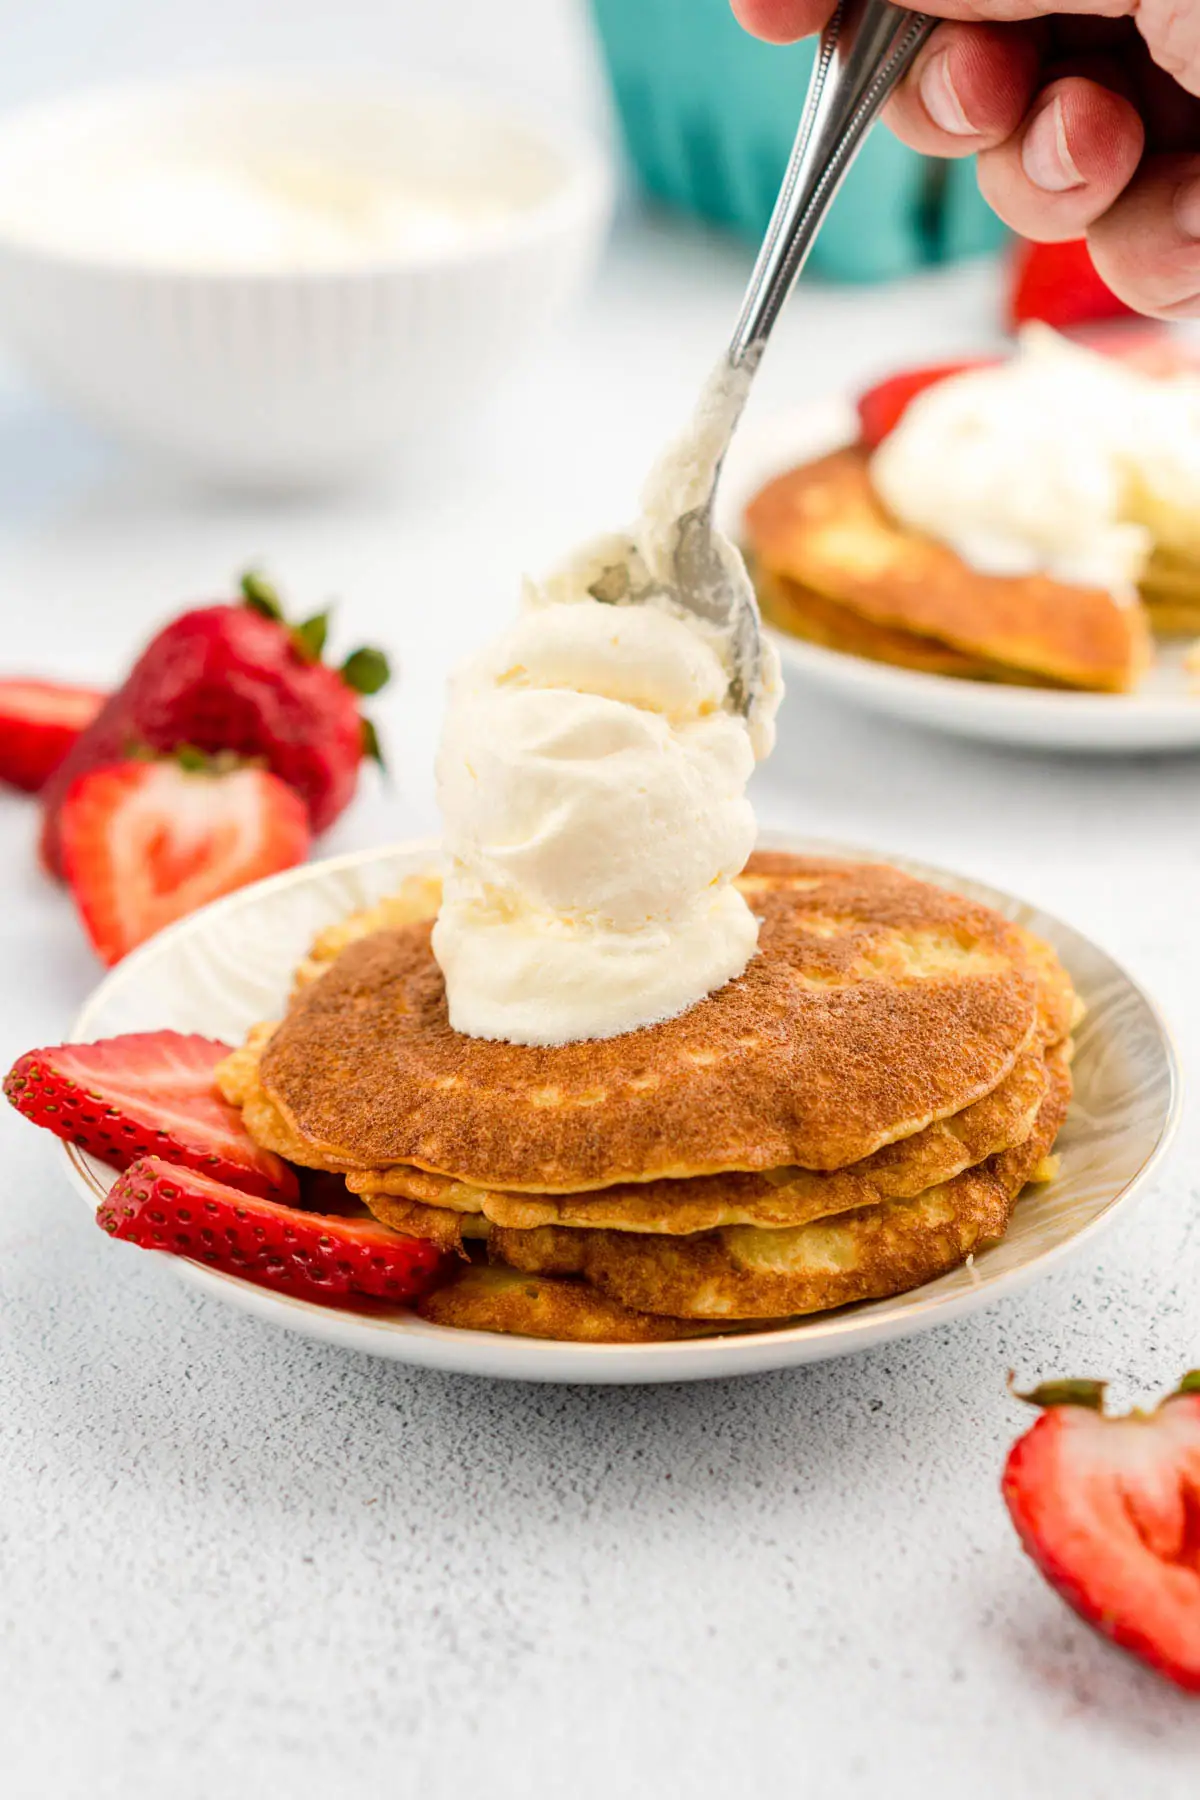
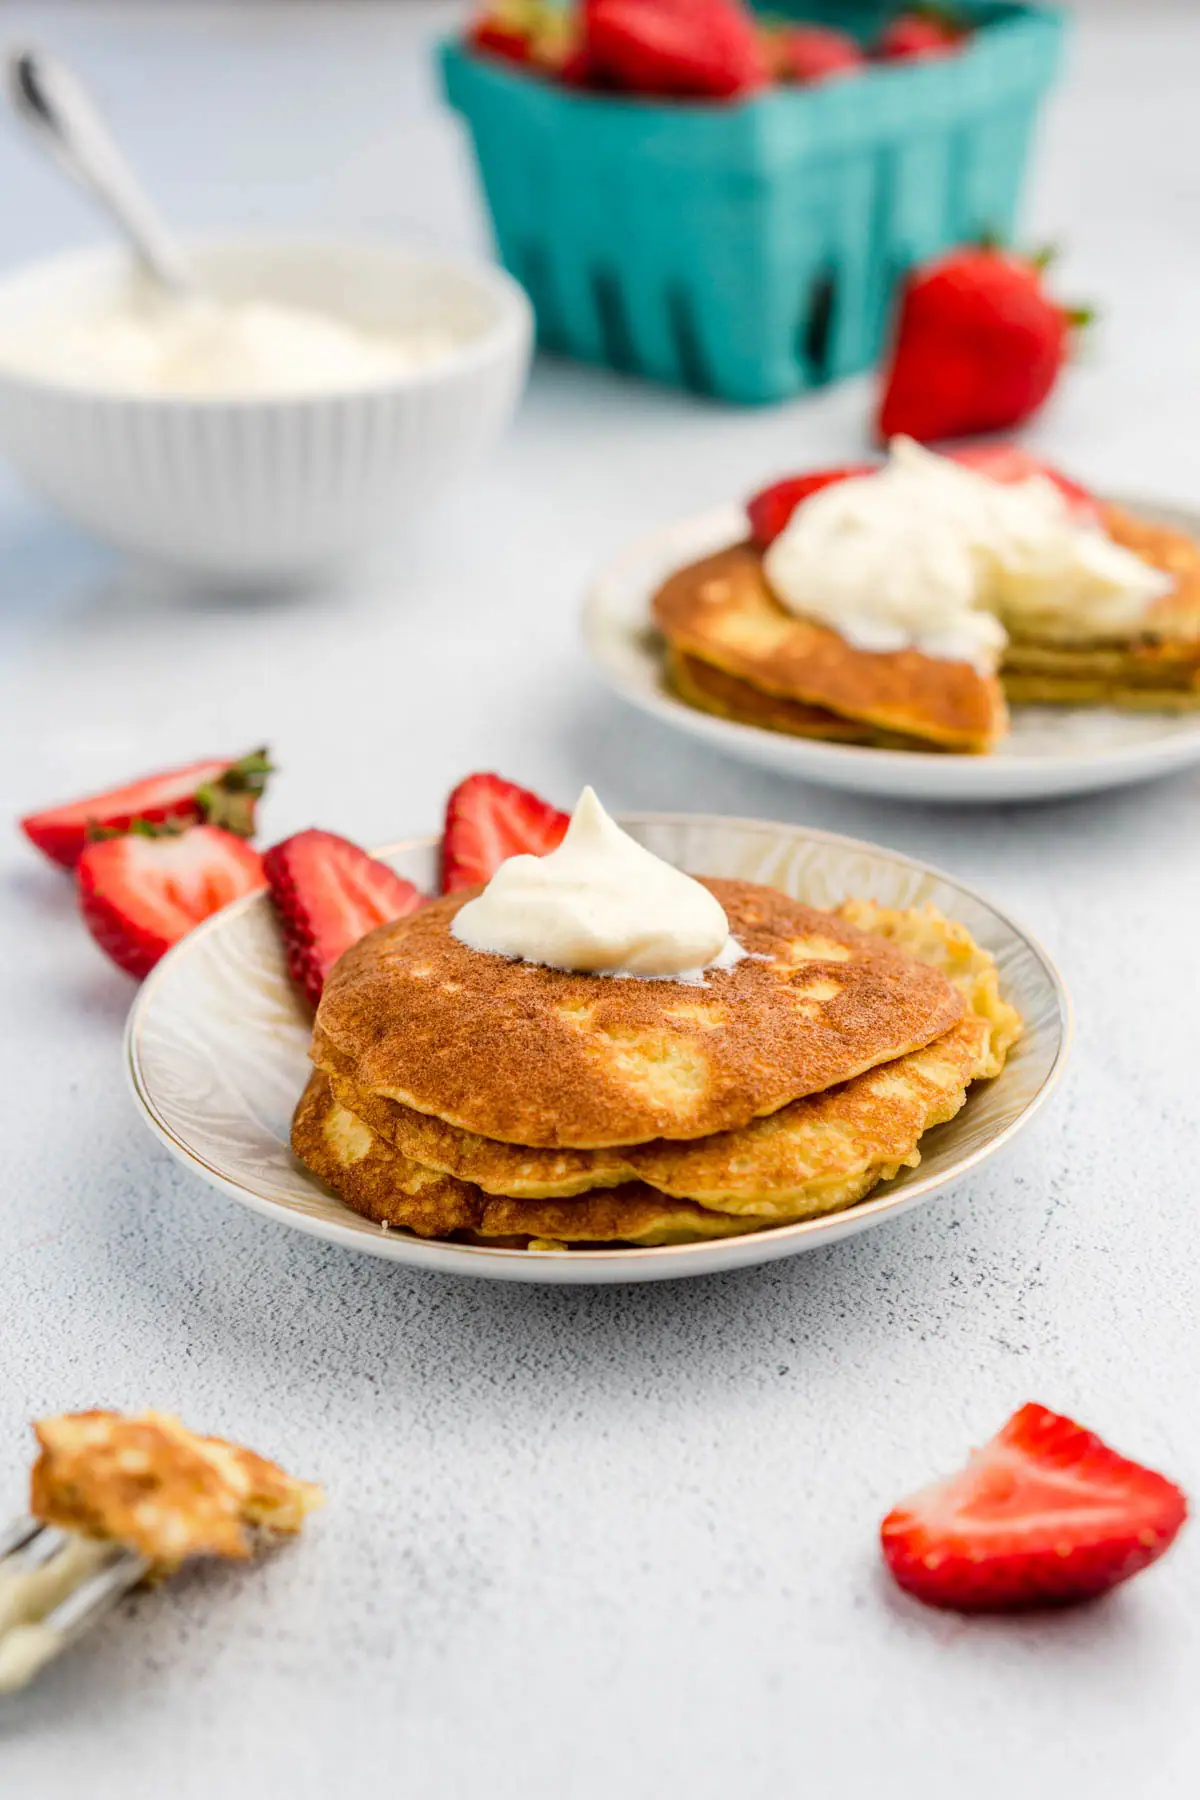
    Keto pancake toppings: A pat of butter topping the pancakes is an excellent keto-friendly topping. Whipped cream is another fantastic option and one of my personal favorites when making this dish. You already have the heavy cream on hand and the blender out – why not whip up a fresh batch? Fresh berries on top really tie the sweet cream keto pancakes together. 

    Berry mix-ins: Yes, you can have fruit on keto! Add the berries directly to the pancake while cooking with the batter-side up instead of folding them into the pancake batter. This will help prevent the batter from becoming diluted or deflating in the bowl.  

    A spoon held placing large dollop of whipped cream on top of pancakes.

    🗓️ Make-Ahead Tips 

    The best way to get a jumpstart on keto breakfast meal prep is to make a big batch of these almond flour pancakes and store them to eat later. They are a great make-ahead keto breakfast!

    Suppose you make the batter ahead of time (or have some leftover) and store it refrigerated. In that case, the ingredients will remain fresh for several days, but the batter will deflate. As a result, the pancakes won't be nearly as fluffy - but they will still taste great!

    📦 Storage, Freezing & Reheating

    Talk about how to store in fridge or freezer, and how long it lasts. Reheating options where appropriate.

    The prepared pancakes store well in the fridge and freezer. While the pancakes tend to disappear quickly, this is good news if you find yourself with leftovers or have a batch cooking session. Here are a few tips for storing, freezing, and reheating the almond flour pancakes.

    Before packing away for storage, allow the pancakes to cool down to room temperature. 

    To store refrigerated, place the pancakes in an airtight storage container. The pancakes will last up to a week in the fridge. To reheat, just pop them in the microwave until warmed, about 30 seconds.

    To freeze, place the pancakes into a freezer-safe airtight storage container; zipper-lock bags work great for this. The pancakes have a tendency to stick together once frozen. Consider stacking them with small pieces of parchment paper in between each layer to prevent sticking and make it easy to remove individual pancakes as needed.

    To reheat frozen pancakes, place them in a single layer on a microwave-safe dish or baking sheet. Microwave the pancakes until warm or pop them in the oven at 325 degrees F until heated through, about several minutes.

    Pancakes topped with whipped cream and strawberries on plates near basket of fruit and bowl of whipped cream.

    🥗 Nutrition Information

    The recipe yields eight 4-inch pancakes and two servings.

    One serving size is half of the recipe, or four of the 4-inch pancakes.

    There are 4g net carbs per serving, with only 1g net carb per pancake!

    The entire batch provides only 8g net carbs.

    Total carbs are a bit higher, which can be attributed to the high-fiber content of the almonds and sugar alcohol in the erythritol. These quantities are subtracted from the total carb count to yield net carbs.

    The nutrition label with complete nutrition information is located in the interactive recipe card below.

    ❓ FAQ

    Will my pancakes still be fluffy if I don't beat the egg white?

    Beating the egg whites is the secret to fluffy keto pancakes. I've tested the recipe both with and without beating the egg whites to soft peaks, and it definitely makes a difference.

    Here is a comparison photo that shows the difference in volume between the two methods.

    In the stack of pancakes on the left, you can see how much taller and fuller each one is than the stack on the right. The pancakes on the right-hand side are thin, lack structure, and droop down in the middle instead of fluffing up.
    Two stacks of almond flour pancakes, the one on the left with beaten egg whites, the one on the right-hand side without.

    Can I use this pancake recipe for keto waffles?

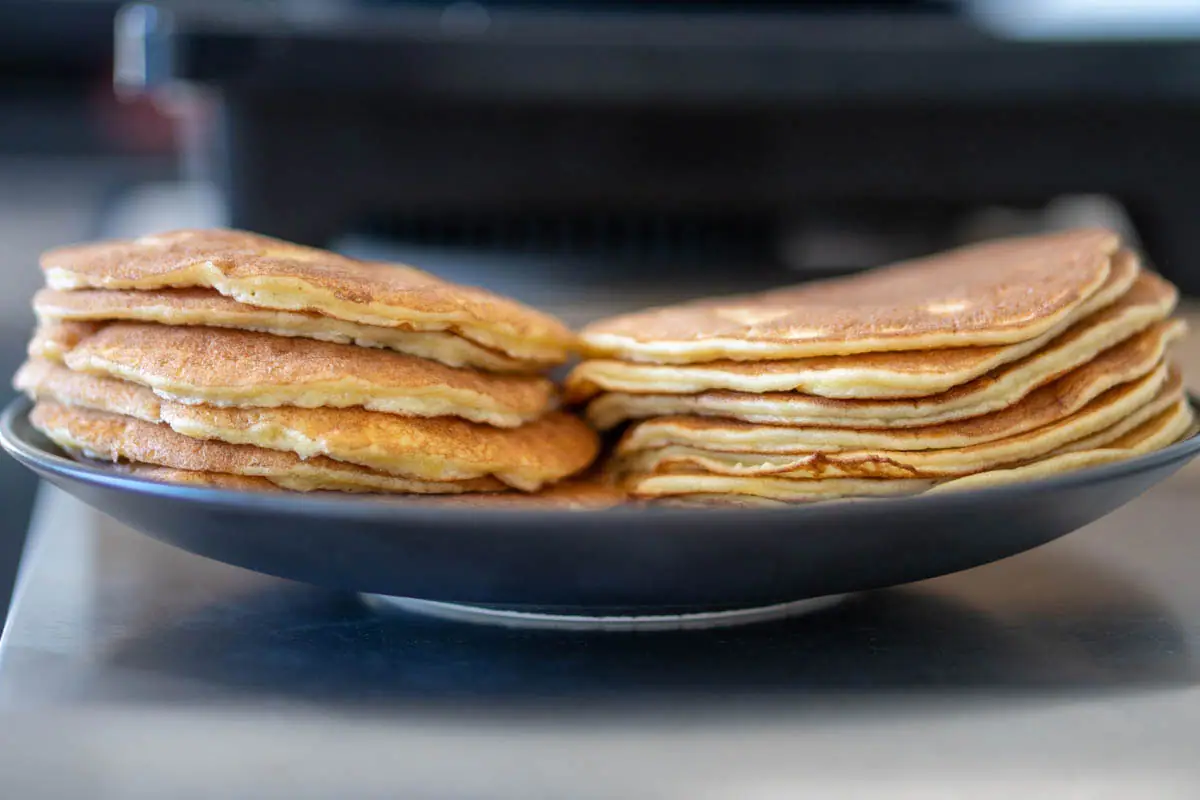
    Yes! This pancake recipe doubles as a keto waffle recipe too. 

    Just use a waffle iron instead of a frying pan or griddle to cook the batter.

    Is almond flour good for keto?

    Yes, almond flour is keto-friendly. 

    Almonds are low in carbs, about half of which are fiber. Almond flour is made by simply grinding down whole almonds.

    In a 1-ounce (dry weight) serving size of super-fine blanched almond flour, there are only 6g total carbs and 3g fiber, yielding only 3g net carbs. 

    How do you eat pancakes on keto diet?

    You can eat pancakes on keto if they are made with low-carb, keto-friendly ingredients. 

    Unfortunately, most pancakes are made with high-carb, starchy ingredients that do not support ketosis.

    Making your own pancakes at home guarantees that the ingredients used support your keto goals.   

    Can you have maple syrup on keto?

    No, traditional maple syrup is high in sugar and carbs, which does not support ketosis.

    However, there are keto-friendly syrups that mimic the flavor of maple syrup using low-carb, keto sweeteners. Commercial brands include Lakanto and Wholesome Yum. 

    You can also follow a recipe to make your own syrup using your favorite keto-friendly sweetener and maple extract. 

    What is a good keto breakfast? 

    Keto pancakes with almond flour are an excellent keto breakfast option. Still, there is plenty of other low-carb food and recipes to choose from for your morning meals. 

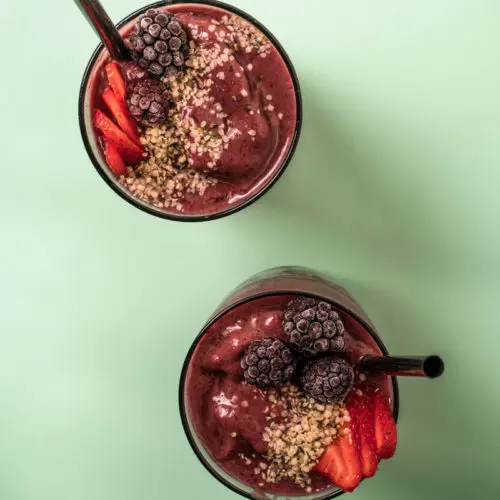
    Smoothies are a speedy way to start your day – to keep it keto-friendly, try this keto avocado smoothie recipe. 

    Frittatas are a fun way to make a big breakfast for the family or meal prep for the week. Many of the ingredients are naturally low-carb, as well. This keto sausage frittata recipe is delicious, and this keto frittata with bacon is incredibly satisfying. 

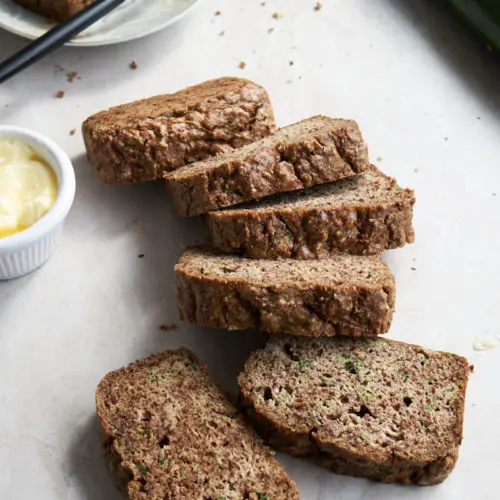
    Keto omelets, keto zucchini bread, and keto waffles are all popular breakfast meals. 

    Low carb vegetables aren’t just for lunch and dinner, but can be enjoyed for breakfast too. Try this cabbage and eggs breakfast dish for a unique twist on traditional hash!

    Still, you can't go wrong with scrambled eggs, bacon, and sliced avocado on the side! 

    📖 Recipe

    Stack of almond flour pancakes on plate with strawberry in background.
    Print Recipe
    4.58 from 138 votes

    Fluffy Keto Almond Flour Pancakes without Cream Cheese

    Light, extra fluffy, and super low in carbs. These keto pancakes are so good you'll want them for breakfast every day!
    Prep Time10 minutes mins
    Cook Time8 minutes mins
    Total Time18 minutes mins
    Course: Breakfast, Brunch
    Cuisine: American
    Diet: Diabetic, Gluten Free, Vegetarian
    Keyword: almond flour, breakfast, easy, fluffy, gluten free
    Special Diet: Gluten-Free, Keto, Low Carb, Vegetarian
    Servings: 2 servings (recipe yields eight 4-inch pancakes)
    Calories: 359kcal
    Author: Tasha

    Ingredients

    • 2 eggs large
    • ¼ cup heavy cream (or heavy whipping cream)
    • 2 tsp erythritol granulated (or preferred sweetener)
    • 1 tsp vanilla extract
    • 1 pinch sea salt
    • 2 oz almond flour finely ground (2 oz = ~⅓ cup tightly packed or ½ cup loosely packed)
    • ½ tsp baking powder gluten free
    • 1 tsp butter unsalted (or preferred cooking oil)
    US Customary - Metric

    Instructions

    • Set up two empty bowls. Over one of the bowls, separate egg whites from the yolks. Use your hands or egg shell halves to hold the yolk and allow the egg whites to drip into the bowl below. Alternatively, use a slotted spoon. Place yolks in the remaining empty bowl. Note: Take care to prevent the yolk from leaking into the whites, as this will prevent them from properly whipping into soft peaks.
    • Beat the egg whites using an electric mixer until soft peaks form, about several minutes. The egg whites are ready once they go from a clear, liquid, soapy texture to a white foam that holds its shape. Reserve the egg whites. Note: Stiff peaks are acceptable in the recipe, though they add several more minutes to the preparation.
    • To the bowl with the yolks, add heavy cream, erythritol, vanilla extract, and sea salt. Whisk or blend until the mixture is smooth.
    • In a separate bowl, combine almond flour and baking powder. Add these dry ingredients to the yolk mixture and whisk or blend until smooth.
    • Fold the beaten egg whites into the almond flour batter, by gently lifting and scooping the ingredients together. Do not stir or overmix, as this will deflate the air whipped into the egg whites and result in flatter pancakes (i.e., not as fluffy). The batter will be a light and airy texture, not liquid.
    • Heat a non-stick frying pan or griddle over medium heat and melt butter over the surface. Use a paper towel to distribute the melted butter evenly across the surface and wipe away excess. 
    • Scoop two tablespoons (⅛ cup; 30 mL) of the batter for each pancake onto the heated surface, then use the back of the measuring spoon to spread and shape the batter into 4-inch circles.
    • Give the pancakes time to cook before attempting to flip and wait until bubbles begin to form at the edge, about 2 minutes. When bubbles appear near the border, use a spatula to gently lift the side to check that the bottom is golden brown. If the pancake has browned, flip and cook on the other side until golden brown, about 1 to 2 minutes.
    • Remove pancakes from the heated surface to serve or store. Serve topped with sugar-free whipped cream, syrup, low-carb berries, or butter. If storing, allow to cool before placing in the refrigerator or freezer.

    Video

    Notes

    Total recipe yields eight 4-inch pancakes.
    Nutrition information provided is for one single serving. One serving is 4 pancakes as prepared per recipe instructions.

    Regarding almond flour measurements: A 2-ounce dry weight of almond flour is roughly ⅓ cup tightly packed or ½ cup loosely packed. The volumetric measurements are approximate and a kitchen scale is recommended for those who require higher accuracy for nutrition tracking and planning purposes. 

    Nutrition

    Serving: 44-inch pancakes | Calories: 359kcal | Carbohydrates: 11g | Protein: 13g | Fat: 32g | Sodium: 277mg | Potassium: 308mg | Fiber: 3g | Sugar: 1g | Magnesium: 83mg | Net Carbs: 4g | Sugar Alcohol: 4g

    ❤️ More Recipes to Love

    Looking for more keto-friendly pancake and waffle recipes? Try one of these:

    Keto Protein Pancakes

    Chocolate Protein Waffles

    Keto Pumpkin Pancakes

    Keto Cream Cheese Waffles

    Keto Kale Salad with Avocado, Chicken, & Lemon Dressing

    June 16, 2021

    Pouring salad dressing over kale salad in bowl.

    Are you looking for an easy keto kale salad with avocado, chicken, and lemon dressing recipe? This one is the absolute best! Plus, it ticks all the boxes:

    • Quick and simple
    • Requires little to no cooking
    • Low carb and keto-friendly
    • Insanely delicious

    You'll love this recipe when you're in a pinch and need a quick dinner, and it's perfect if you're running out of healthy lunch ideas.

    This massaged kale salad is tender and savory, bursting with flavorful avocado, chicken, and lemon dressing vinaigrette made with Dijon mustard and black pepper. Red onion adds a beautiful pop of color, and sesame seed kernels deliver a satisfying crunch. The result is an unbeatable flavor combination that's sure to please even the pickiest of palates. 

    Of course, the salad is great for keto too. All of the ingredients are whole foods and low in carbohydrates, with no sugar or starchy fillers in the dressing. Kale and avocado are both nutritional powerhouses, providing plenty of micronutrients and electrolytes necessary for a healthy keto diet. An easy keto-friendly dish that's filled with superfoods and tastes amazing – what's not to love?

    [feast_advanced_jump_to]

    🥘 Ingredients

    • Kale
    • Avocado
    • Chicken breast
    • Red onion
    • Extra virgin olive oil
    • Dijon mustard
    • Lemon juice
    • Pepper
    • Sea salt
    • White wine vinegar
    • Sunflower seed kernels

    Kale: the recipe uses raw Lacinato kale, also known as dinosaur kale, Tuscan kale, or cavolo nero. This kale is a bit more tender than the curly varieties, making it an excellent option for raw kale salads. Still, it does require massaging to make the leaves tender without cooking. Massaging also makes the leaves less bitter. There are different kale varieties to choose from, which can be interchanged based on personal preference and what's available in your area. Just make sure that you use raw kale instead of frozen options to ensure the dish is fresh – save the frozen kale for cooked dishes or smoothies. Note that if you use baby kale, the leaves do not have to be massaged to tenderize, and it is optional.

    Chicken breast: Any cooked chicken breast will suffice. This is an excellent opportunity to use chicken breast made during meal prep or time-saving rotisserie chicken. Sautéed or grilled chicken is fantastic in this recipe. Just give the meat time to cool or chill before using it in the salad.

    Vinegar: White wine vinegar is used in the recipe, but that you can use cider, red wine, or balsamic vinegar to make the lemon dressing vinaigrette instead if you have it handy.

    Lemon juice: Freshly squeezed lemon juice is preferred, but bottled lemon juice is an acceptable substitute if necessary. Just read the label to make sure it aligns with your dietary needs.

    Overhead shot of ingredients used to prepare recipe: kale bunch, chicken breast on plate, olive oil in cup, lemon, cut avocado and red onion.

    👩‍🍳 How to Make

    Prepare the kale

    The first thing you want to do is prepare the kale. When making the salad, they typically use two bunches of kale which yields approximately 8 cups total once chopped.

    Wash the kale leaves and dry thoroughly. Cut the thick, stocky stems out of each piece with a sharp knife. Or strip the stems out by pulling and tearing off the dark green leafy part with your hands. Discard the fibrous stems.

    Chop or tear the leaves into strips or ribbons, and place them in a large bowl.

    Drizzle a small amount of olive oil over the kale, sprinkle with a pinch of salt, and massage kale until it just starts to become wilted and tender, about 30 to 60 seconds, give or take. Do not over massage, or the leaves will become overworked and lose their salad texture – stop when it starts to wilt, not when it's completely wilted.

    Set the bowl aside and prepare the other ingredients.

    Step by step process of preparing and massaging kale leaves for salad.

    Chop the ingredients

    Chop the cooked chicken breast into small, half-inch cubes. Add the chicken to the kale.

    Dice or slice the red onion into small pieces. Add the onion to the bowl.

    Cut the avocado in half and remove the pit. Carefully score the avocado flesh in a grid, horizontally (top to bottom) and vertically (crosswise), to create square chunks. Scoop out the avocado chunks with a spoon and transfer them to the kale salad.

    Add the sunflower seed kernels to the salad bowl.

    You can either toss the salad now or wait until after it has been dressed.

    Chopped ingredients on top of massaged kale leaves before tossing salad together.

    Preparing the lemon dressing vinaigrette

    For the salad dressing, use a jar with a lid so you can shake the vinaigrette to mix it all together quickly. If you don't have a lidded jar or container, use a bowl and whisk instead.

    Add extra virgin olive oil to the jar, then squeeze the juice of half a lemon in. If using bottled lemon juice, use two tablespoons.

    Add in white wine vinegar, Dijon mustard, black pepper, and sea salt. Mix the dressing by screwing the lid on tightly and giving it all a good shake.

    Finally, pour the dressing over the prepared kale salad with avocado and chicken, toss together well, serve, and enjoy!

    Step by step process photos of preparing salad dressing and tossing the salad.

    🗓️ Make-Ahead & Meal Prep Tips

    If you plan to make this salad ahead of time, I suggest getting a few things ready but waiting to combine all of the elements until you're ready to serve. Store the ingredients and dressing separately to make it last longer.

    For example, you can chop all of your vegetables and chicken ahead of time during your meal prep session. Except for avocado – don't cut that until just before serving.

    Get the kale ready for its massage, but hold off on the massage until the day you serve to make it last longer. Pre-massaging is an option, but it will shorten the shelf-life – massaged kale will only last refrigerated for about three days.

    The lemon dressing vinaigrette is an excellent make-ahead option, so be sure to include this during meal prep to save time at lunch or dinner. Just store refrigerated until ready to use, then shake well before dressing the salad.

    Lemon dressing poured from mason jar onto chopped kale mixed with avocado, chicken, red onions, and sunflower seed kernels in bowl.

    🍽️ Recipe Adaptations

    Swap the kale: Have another leafy green on hand? Not a fan of kale? Feel free to substitute another dark leafy green for the kale in this recipe. Spinach, romaine, or arugula would be fantastic swaps with the flavor profile, but feel free to get creative. Just remember to skip the massage step if using another green.

    Sweeten it up: If you prefer sweet dressings, there's no reason you can't enjoy them on keto. Add a small amount of keto-friendly sweetener to the dressing before shaking and adjust to taste. Stevia, monk fruit, and erythritol are all popular options. Still, I prefer to use allulose in liquids because it dissolves completely and behaves similarly to sugar, making it a wonderful one-to-one substitute in recipes.

    Get cheesy: feel free to add cheese to the salad. Parmesan is an excellent addition to the recipe, but something a little tangier, like goat cheese, would work as well.

    Nuts and seeds: sunflower seed kernels at a nice bit of crunch, that you can use other nuts and seeds for salad toppings. Chopped walnuts, pinenuts, or almond slices would make excellent additions or substitutions for the sunflower seeds.

    Dressing: If you're looking to try something other than a lemon vinaigrette, tahini dressing, yogurt dressing, or avocado dressing would pair well with the rest of the ingredients.

    Protein: To add more protein, consider doubling the chicken breast quantity. You can also swap your protein using turkey or salmon fillets. Or add a little variety by combining more than one meat – bacon crumbles would be divine with the chicken and avocado kale salad.

    Vegetarian: The plant-based crowd can still enjoy kale salad on keto. Consider using grilled or baked tofu cut into cubes to replace the chicken (super-firm is lowest in carbs). Chopped hard-boiled eggs would also make a good meatless option.

    Salad in shallow dish with glass of water in background.

    📦 Storage

    Keto kale salad with avocado is best served immediately after preparation. Cut avocado doesn't store well or last long in the fridge. The recipe can be scaled up or down in the interactive recipe card below so you can make what you need.

    However, there are a few workarounds if you are planning for leftovers. Instead of tossing the avocado with the salad, you can keep the avocado separate and garnish individual servings. Additionally, if you store the dressing separately on the side and dress only during meal times, the salad will last longer.

    The massaged kale salad stored without avocado or dressing will last up to three days refrigerated in an airtight container.

    The salad dressing will last up to two weeks refrigerated in an airtight container.

    Chicken and kale salad in shallow white bowl.

    🥗 Nutrition Information

    With kale and avocado as star ingredients, it's no surprise this dish is healthy and nutritious. But the other ingredients in the recipe provide nutritional benefits as well!

    Kale is praised as a superfood, high in fiber, vitamins, minerals, and antioxidants. Not only is it loaded with vitamins A, C, and K, it is a rich source of calcium and manganese. Kale is also a low-oxalate leafy green, which allows the body to absorb calcium more readily.

    Avocado and extra virgin olive oil (EVOO) provide an excellent source of healthy fats and contain many antioxidants, which may have anti-inflammatory effects. These fats are known to benefit heart health and help absorb the fat-soluble vitamins in your food. Avocado is also a fantastic source of potassium (super essential to fight keto flu!).

    Chicken is a high-quality source of protein, lemon juice boosts vitamin C, and the sunflower seed kernels offer a wide range of micronutrients.

    The recipe prepared as written provides high amounts of monounsaturated fats, B vitamins, folate, vitamins A, C, E, and K, calcium, magnesium, and selenium. It's incredible how big an upgrade your nutrition can get with something as simple as a salad!

    The calories and macronutrients (macros) for each serving are provided in the nutrition label found in the interactive recipe card below. Net carbs for each 2-cup serving of the keto kale salad are only 3g.

    ❓FAQ

    How do you massage kale?

    Massaging kale is super easy!

    First, remove the thick stems from each leaf. Tear or cut the kale into thin strips or small pieces and place them into a bowl.

    Drizzle a small amount of olive oil over the leaves and add a pinch of salt. Use your hands to squeeze and rub the leaves together, distributing the olive oil and salt.

    Do this until the kale becomes tender and begins to wilt, but don't overdo it, or the leaves may become mushy instead of soft.

    For Lacinato kale, massaging for about 30 to 40 seconds is adequate, though curly varieties may require one to two minutes.

    Does massaging kale make it less bitter?

    Yes, massaged kale is less bitter.

    When you massage kale with oil and salt, this allows the vegetable to absorb and infuse those flavors, in addition to breaking down the rigid, fibrous cell walls in the leaves.

    This process makes it easier to chew and digest while also enhancing the flavor.

    Is kale okay on keto?

    Yes, kale is a non-starchy vegetable high in fiber and low in net carbs, making it an acceptable keto-friendly option for salads and other dishes.

    In 100 g of raw kale, there are 4.42 g total carbs and 4.1 g fiber, yielding a net carb count of only 0.32 g. 

    In 1 cup of kale, total carbs are 0.91 g and fiber 0.85, for a net carb total of just 0.06 g. Since the carbohydrates are mostly from fiber, they do not directly impact ketosis and can be excluded from the total carb count on keto.

    How many carbs are in kale salad?

    The carbs in kale salad will depend on the types of ingredients used, including toppings and dressings.

    While kale is extremely low in carbs on its own, dressings with sugar or starch ingredients could contribute to a high carb count. Keep carbs down by using low-carb ingredients and high-fiber, non-starchy vegetables.

    For this keto kale salad, there are 8 g total carbs with 5 g coming from fiber for a net carb total of 3 g per 2-cup serving.

    What salad dressing is good for keto?

    Best salad dressings for keto are the ones that are low in sugar and free of starchy ingredients and fillers that contribute to the total carb count.

    Homemade salad dressings tend to be better options for keto, as you can choose what goes in (usually an oil or fat with herbs and spices) and what stays out (sugar, flour, etc.).

    Oil-based vinaigrettes, like the lemon dressing in this recipe, are great options. Creamy salad dressings suitable for keto may use mayonnaise, Greek yogurt, sour cream, or blended avocado for the base.

    Is kale salad good for weight loss?

    Kale is low in calories and packed with nutrients, making it a popular dietary option for weight loss goals.

    It's also high in fiber, which supports appetite regulation and gut health – two critical factors of the weight loss equation.

    Kale salad can be good for weight loss purposes when paired with mindful eating and portion control.

    📖 Recipe

    Pouring salad dressing over kale salad in bowl.
    Print Recipe
    5 from 2 votes

    Keto Kale Salad with Avocado, Chicken, & Lemon Dressing

    This quick and easy massaged kale salad is bursting with flavorful avocado, chicken, and peppery lemon dressing. A simple, healthy meal that is low-carb and keto-friendly!
    Prep Time10 minutes mins
    Total Time10 minutes mins
    Course: Dinner, Lunch, Main Course, Salad, Side Dish
    Cuisine: American
    Diet: Diabetic, Gluten Free, Low Calorie
    Keyword: easy, healthy, keto, low carb, quick, salad, simple, vegetables
    Special Diet: Dairy-Free, Gluten-Free, Keto, Low Carb, Paleo
    Servings: 4 Servings
    Calories: 330kcal
    Author: Tasha

    Ingredients

    The Salad

    • 8 cups kale raw (~2 bunches)
    • ½ tsp extra virgin olive oil
    • 1 pinch sea salt
    • 1 chicken breast cooked, chopped into ½-inch cubes
    • ¼ red onion medium, diced
    • 1 avocado cut into square pieces
    • ¼ cup sunflower seed kernels

    The Dressing

    • ¼ cup extra virgin olive oil
    • 2 tbsp lemon juice freshly squeezed (~½ lemon)
    • 1 tbsp Dijon mustard
    • 1 tbsp white wine vinegar
    • ¼ tsp black pepper ground
    • ⅛ tsp sea salt

    Instructions

    Prepare the Kale Salad

    • Wash and dry kale leaves. Cut or strip out thick stems from each leaf and discard. Chop or tear the green leafy part of kale into strips or ribbons, about ½-inch thick, and place in large bowl.
    • Add a small amount of olive oil and salt to the kale. Massage the oil and salt into the leaves by rubbing and squeezing together until they start to become tender and wilt, about 30 to 60 seconds. Take care not to over-massage the kale to prevent loss of texture.
    • Add chopped chicken, diced red onion, avocado pieces, and sunflower seed kernels to the bowl. Toss the salad to evenly distribute the ingredients throughout.

    Prepare the Lemon Dressing Vinaigrette

    • Add remaining olive oil, lemon juice, white wine vinegar, Dijon mustard, black pepper, and sea salt to a container or jar with tightly fitted lid.
    • Secure the lid and shake well until the ingredients have combined, about 20-30 seconds.
    • Pour the dressing over the prepared kale salad and toss before serving.

    Video

    Notes

    Nutrition information is based on a single serving and is provided as a convenience for Ketogasm readers. Data may vary based on brand and recipe variation.

    Nutrition

    Serving: 2cups (~166g) | Calories: 330kcal | Carbohydrates: 8.04g | Protein: 19g | Fat: 26g | Sodium: 215mg | Potassium: 594mg | Fiber: 5.07g | Sugar: 1.27g | Magnesium: 72mg | Net Carbs: 3g

    ❤️ More Recipes to Love

    • Keto Broccoli Salad
    • Keto Stuffed Bell Peppers
    • Shrimp Salad in Avocado Boats
    • Keto Avocado Tuna Salad
    • Cucumber Noodle Salad
    • Keto Guacamole

    Chorizo Sausage Stuffed Poblano Peppers (Keto)

    June 12, 2021

    Up close photo of roasted poblano pepper with chorizo sausage and crema cotija garnish

    Keto stuffed poblano peppers with chorizo sausage double down on smoky goodness and flavors inspired by Mexican and southwestern cuisine. If you’re looking to switch things up for Taco Night, this recipe is a keeper. This keto dinner recipe is also easy to adapt, so you can swap out the chorizo ground sausage stuffing with your favorite protein, including taco meat, cheesy chicken, or even Italian-style beef stuffed peppers without rice. 

    Still, the chorizo sausage stuffed poblano peppers are a winning combo that any fan of Tex-Mex food will love. Of course, you can make homemade chorizo with unseasoned ground pork, but there are readymade options that are keto-friendly available at most grocers.

    The stuffed poblanos can be enjoyed year-round, terrific for baking in the oven, or tossed on the grill when the weather heats up.

    [feast_advanced_jump_to]

    🥘 Ingredients

    The keto stuffed poblano peppers include the following ingredients:

    • Poblano peppers
    • Ground pork chorizo sausage
    • Tomato paste
    • Cumin
    • Chili powder
    • Onion powder
    • Salt
    • Water
    • Mushrooms
    • Cotija cheese
    • Mexican crema
    • Cilantro

    Poblano peppers - Poblano peppers are sometimes sold as “Pasilla Peppers” in the U.S. You are looking for the fresh, wide, dark green pepper that’s about 4-inches long and a bit heart-shaped–not the skinny, dried pasilla. 

    Chorizo sausage - Use the ground pork chorizo options that come pre-seasoned with chili pepper, paprika, garlic, and other spices, or make your own using unseasoned ground pork and homemade chorizo spice mix. There are multiple chorizo varieties available in the grocery store, but to keep it low-carb and keto-friendly, opt for the more natural types without sugar and starchy fillers, like Hempler’s all-natural chorizo.

    Cotija cheese - Cotija is a salty Mexican cheese with a tangy flavor that easily crumbles when fresh, similar to feta cheese. Cotija makes an excellent garnish for southwestern dishes, but it doesn’t melt well. If you are after a melty, cheesy stuffed poblano, consider swapping cheeses.

    Mexican crema - Crema is similar to sour cream, but it’s not as sour or thick, has a higher fat content, and is pourable. You can swap the condiments if needed, but Mexican crema is a fantastic finishing touch for Tex-Mex flavors.

    Stuffed poblano peppers in casserole dish topped with cilantro and Mexican crema.

    👩‍🍳 How to Make

    Prep the peppers

    Charring and peeling the poblanos before stuffing delivers that classic smoky flavor. If you are baking the recipe, roast the peppers under a broiler on high until the skin blackens. If grilling, place peppers directly on grill grates, flipping on each side, and remove after blackening.

    Carefully transfer the peppers to a dish and cover completely with foil or cling wrap. This allows the peppers to steam a bit as they cool down.

    Once the peppers are cool to the touch, remove the charred skin to peel the peppers. 

    Cut into the top layer of the pepper, making a slit lengthwise to create an opening or pouch. Avoid cutting through both layers of the pepper by running the blade across the pepper instead of a chopping motion, or consider using kitchen shears for better control.

    Prepare the filling

    Brown ground pork chorizo sausage in a skillet over medium heat, breaking into smaller pieces as it cooks. Discard the excess fat that cooks off.

    Add your seasonings to the pan, including tomato paste, cumin, chili powder, onion powder, and salt. Pour water into the mixture and stir to incorporate ingredients. 

    Bring the mixture to a boil, then lower heat and simmer until the liquid cooks off. Remove the mixture from heat and stir in the mushrooms.

    Stuff each poblano pepper with the meat mixture and place it flat in its cooking vessel. If baking, use a lightly greased casserole dish or line it with parchment paper to prevent the peppers from sticking to the bottom. If grilling, a well-seasoned cast-iron pan works great.

    Bake for 10 to 15 minutes at 400 degrees F or grill for 10 to 15 minutes over indirect heat at medium-high heat.

    Garnish the keto stuffed poblano peppers with cotija cheese, crema, and cilantro. Serve and enjoy!

    Overhead shot of the prepared stuffed poblano peppers recipe in a blue casserole dish.

    🗓️ Make Ahead Tips

    To get a jumpstart on cooking for busy nights or entertaining guests, consider making parts of the dish ahead of time. 

    You can char and peel the peppers up to 1 to 2 days in advance and store them covered in airtight containers refrigerated until ready to use.

    You can also prepare the filling ahead of time, which holds up even longer in the fridge. The cooked pork will last for 3 to 4 days refrigerated in airtight containers.

    Stuff the peppers a day ahead of time, then bake or grill them to make quick work of dinner the next day. 

     🍽️ Recipe Adaptations

    Taco Seasoning - If you have keto taco seasoning mix, you can swap out the individual spices in the recipe for a tablespoon of your spice blend to get that savory taco flavor.

    Casserole - Love the flavors but don’t feel like stuffing individual peppers? Chop the peeled peppers and layer with the chorizo sausage mixture to make an easy casserole dinner.

    Swap your protein - Ground or shredded chicken, beef, or turkey would work wonders in this recipe. Keto chicken chili would be a perfect combo!

    Get cheesy - Cotija is a great way to garnish the dish, but Monterey Jack, mild cheddar, queso quesadilla, and asadero cheeses are also popular in Southwestern and Mexican recipes. A combination of these cheeses can be found in pre-grated Mexican cheese blends and just so happen to be excellent melting cheese. 

    Breakfast - Rise and shine! Scramble a few eggs into the mixture for a hearty breakfast option. This is especially easy if you go the make-ahead route. 

    Swap your veggies - Not a fan of mushrooms? Dice up or shred one of the other keto-friendly vegetables to take its place. Riced cauliflower, chayote, zucchini, celery, or onions would be great in this dish. Feel free to experiment or add extra veggies in to boost the nutrition. 

    Swap your peppers - You can use bell peppers with this recipe if you prefer. Just skip the peeling step and cut in half lengthwise instead of creating a little pouch to stuff. Fill each half with the toppings and bake covered in foil for 30 to 40 minutes. Anaheim peppers are similar to poblanos in flavor and spice level, but they are quite a bit skinnier. You can opt to stuff these, but you’ll need more of them to use up your stuffing.

    Roasted poblano pepper cut open and stuffed with ground pork chorizo sausage.

    📦 Storage and Freezing

    The prepared recipe lasts up to 1 to 2 days refrigerated in airtight containers.

    If you require a longer time frame, consider freezing the dish. Allow the peppers to cool to room temperature, then seal tightly to prevent freezer burn by covering the entire dish in foil followed by cling wrap or using a food vacuum sealer. 

    If preferred, freeze individually covered tightly in cling wrap placed in zipper-lock bags or food vacuum packed. 

    The stuffed poblano peppers will last up to 3 months in the freezer.

    To reheat, remove the storage wrapping and bake directly in the oven at 350 degrees F until the peppers are thoroughly warmed through, about 30 minutes.

    🥗 Nutrition Information

    In addition to being low-carb and keto-friendly, this recipe also provides various micronutrients necessary for balanced nutrition. 

    Thanks to the poblano peppers, the meal is loaded with vitamin C. People commonly think of oranges and citrus fruit when it comes to vitamin C, but peppers are an excellent source. Since peppers are also low in sugar, they are a better fit for keto macros than sugary oranges.

    Ground pork chorizo sausage also delivers vitamins and minerals, including high amounts of selenium, choline, zinc, and B vitamins (like cobalamin, niacin, riboflavin, pyridoxine, and thiamine). It’s also rich in high-quality protein, which helps you feel full. 

    You can find the nutrition label for the recipe in the interactive recipe card below.

    Single chorizo stuffed poblano garnished on a white plate near fork.

    ❓FAQ

    Are poblano peppers keto-friendly?

    Yes! Poblano peppers are low in total and net carbohydrates, which supports ketogenic dietary patterns. 

    "Keto-friendly" means that something is low enough in carbs that a reasonable serving size would still support ketosis.

    How many net carbs in poblano peppers?

    Poblano peppers have 4.64g total carbs and 1.7g of fiber per 100-gram weight, giving a net carb count of 2.94g for this amount. 

    One poblano pepper (65g) contains only 3.0g total carbs, 1.0g fiber, and 2g net carbs. 
    [3g total - 1g fiber = 2g net carbs]

    Do you have to peel poblanos before stuffing?

    Poblanos have a tough outer skin that can be difficult to chew and digest when roasting, but peeling eliminates this issue. 

    Charring and peeling also impart a smoky flavor that elevates the dish's taste to a new level. 

    You can skip the peeling step if you prefer, but the resulting texture and flavor are superior when you peel poblanos before stuffing.

    Are poblano peppers hot or sweet?

    Poblano peppers are not sweet, but they do have a mild to medium heat level. So while they aren't as spicy as jalapeño peppers, those with a sensitive palate may consider them spicy. 

    If you are concerned about the dish being too spicy, be sure to remove all the seeds from the peppers. The seeds are often coated with capsaicin-rich oils that can make them spicier than the pepper's flesh. Another alternative is to use bell peppers instead, which are sweet instead of spicy.

    📖 Recipe

    Up close photo of roasted poblano pepper with chorizo sausage and crema cotija garnish
    Print Recipe
    5 from 2 votes

    Keto Stuffed Poblano Peppers with Chorizo Sausage

    Smokey roasted poblanos stuffed with chorizo sausage and bursting with classic southwest flavors. Low-carb and keto-friendly!
    Prep Time10 minutes mins
    Cook Time25 minutes mins
    Total Time35 minutes mins
    Course: Dinner, Main Course, Meal Prep
    Cuisine: American, Mexican, Tex-Mex
    Special Diet: Keto, Low Carb
    Servings: 6 stuffed peppers
    Calories: 269kcal
    Author: Tasha

    Ingredients

    • 6 poblano peppers
    • 1 lbs pork chorizo sausage ground
    • 1 tbsp tomato paste
    • 1 tsp cumin ground
    • 1 tsp chili powder
    • 1 tsp onion powder
    • ¼ tsp salt or to taste
    • ¾ cup water
    • 1 cup mushroom caps diced
    • 2 tbsp cotija cheese crumbled
    • 2 tbsp Mexican crema or sour cream (optional)
    • ¼ cup cilantro
    US Customary - Metric

    Instructions

    Prepare the Peppers

    • Set broiler to high.
    • Place peppers on sheet pan and broil for 2 to 3 minutes on each side, or until the skin blackens.
    • Remove the peppers from oven and place in a bowl covered in foil or cling wrap. Alternately, place in a heat-safe, zipper-locked bag. Allow peppers to steam in the container until they are cool to the touch. Once cool, lift blackened areas from poblanos to peel skins off peppers.
    • Carefully slit the lengthwise along one side of each pepper, to create an opening for stuffing, taking care not to puncture through both sides. Remove seeds from within and discard.

    The Filling

    • Set oven temperature to 400 degrees F.
    • Brown ground pork chorizo sausage in a skillet over medium heat. Discard excess grease.
    • Add tomato paste, cumin, chili powder, onion powder, salt, and water to skillet and mix well. Bring to a boil, the reduce heat to low and simmer until excess liquid cooks off.
    • Remove skillet from heat and stir in mushrooms.
    • Stuff mixture into the hollowed out peppers and place on a casserole dish lined with parchment paper or lightly greased. Bake for 10 to 15 minutes.
    • Serve garnished with cotija cheese, crema, and cilantro divided between the peppers.

    Notes

    Grilling information: Char peppers on grill grates over high, direct heat; grill after stuffing in a cast-iron pan on medium-high over indirect heat for 15 minutes.

    Nutrition information is based on a single serving and is provided as a convenience for Ketogasm readers. Data may vary based on brand and recipe variation. 

    Nutrition

    Serving: 1stuffed pepper (~149g) | Calories: 269kcal | Carbohydrates: 7.3g | Protein: 12.4g | Fat: 21.7g | Sodium: 784mg | Potassium: 426mg | Fiber: 1.4g | Sugar: 1.9g | Magnesium: 22mg | Net Carbs: 5.9g

    Easy Keto Stuffed Bell Peppers without Rice

    June 9, 2021

    Stuffed peppers in casserole dish.

    Looking for a tried and true keto stuffed peppers recipe? You’re in luck. Making stuffed bell peppers without rice, breadcrumbs, or starchy fillers automatically lowers the high carb count found in traditional recipes, helping to make the meal keto-friendly. The Italian-style flavors are a time-tested favorite, delivering perfectly seasoned meat and ooey-gooey melted cheese every time. 

    The dish is easy to whip up, and you can even make it ahead of time. The recipe delivers delicious keto comfort food that provides a satisfying family dinner, lunch leftovers, or meal prep solution. It’s also incredibly versatile so that you can switch up the ingredients for a variety of exciting new flavor combos.

    Keto stuffed bell peppers are a great way to add colorful, healthy vegetables to your diet. Non-starchy keto vegetables like bell peppers contain vitamins, minerals, phytonutrients, and fiber necessary for well-balanced nutrition. Even the pickiest of eaters will love this recipe!

    [feast_advanced_jump_to]

    🥘 Ingredients

    • Bell peppers (green, red, orange, or yellow)
    • Ground beef
    • Onion
    • Garlic
    • Tomato paste
    • Italian seasoning
    • Pepper
    • Salt
    • Water
    • Cauliflower rice
    • Mozzarella cheese
    • Fresh basil (optional)
    Ingredients to make the recipe, including green, red, and yellow bell peppers, salt, pepper, Italian seasoning, tomato paste, riced cauliflower, onions, mozzarella cheese, ground beef, and garlic.

    Bell peppers: You can make keto-friendly stuffed peppers with any color or combination of peppers you choose. Green bell peppers are the lowest in carbs, so that’s always a popular choice for the keto crowd. Still, red, orange, and yellow bell peppers can be suitable options if your macros allow–they have a natural sweetness to them, while the green peppers tend to be slightly bitter. 

    Tomato paste: A small amount of tomato paste diluted with water delivers a strong tomato flavor without the added sugars found in commercial sauces or extra carbs from the whole fruit, helping keep the carbs low. You can certainly use fresh or canned diced tomatoes and their juices. Just know the final carb count will be slightly higher.

    Cauliflower rice: Instead of using rice, finely chopped cauliflower gives a similar texture to the grain-based recipes. Use fresh or frozen riced cauliflower to make stuffed bell peppers without rice, or choose a different low-carb veggie.

    Cheese: Using cubed cheese leaves epic pockets of melty cheese. However, you can top the stuffed peppers with grated cheese or slices if you prefer. Mozzarella or mild cheddar cheeses are fantastic for melting. If you have dairy-related dietary restrictions, leave the cheese out for a dairy-free version of the dish. 

    👩‍🍳 How to Make

    Preparing the bell peppers

    To prepare the bell peppers, slice the stemmed tops off. Scoop the seeds and ribs out and discard, leaving hollow bell pepper shells. Alternatively, you can cut the peppers in half lengthwise to make smaller portions.

    To ensure the peppers end up tender enough to pierce with a fork, they need to be cooked briefly before stuffing. A microwave comes in handy to keep this step quick. Fill a deep microwave-safe dish with ½-inch of water and place the peppers hollow-side down. Microwave for 5-6 minutes.

    If you don’t have access to a microwave, pre-bake peppers cut-side down in an oven at 425 degrees F for 30 minutes. If grilling, you can opt to pre-grill the peppers on an oiled grill over medium-high heat for 6-7 minutes.

    You can stuff the bell peppers without cooking them first, but they tend to retain their crunchy texture.

    Step by step instruction of cutting tops off of bell peppers, scooping out seeds, pre-cooking in dish, and placing in casserole dish to fill and bake.

    Preparing the filling

    The meat mixture filling comes together on the stovetop, but the peppers are baked or grilled after stuffing.

    To make the filling, brown ground beef in a pan over medium heat, breaking it down into smaller pieces as it cooks. Discard excess fat that cooks off.

    Add onion to the pan and cook until soft. Stir in garlic and cook until fragrant. Mix in tomato paste, Italian seasoning, pepper, salt, and water. Bring the mixture to a boil, then drop to a simmer until water cooks off and a thicker sauce develops. Remove pan from heat and stir in riced cauliflower.

    Allow the meat mixture to cool, then mix in cubed cheese. Fill the bell pepper shells with the meat and cheese mixture, about ¼-cup each, then place them upright in a casserole dish (for oven) or cast-iron skillet (for the grill).

    Bake in a preheated oven covered in foil at 425 degrees for 30-40 minutes or grill over indirect heat at 375 degrees for 30-40 minutes, or until the bell peppers are fork-tender and the cheese has melted. Garnish with fresh basil and enjoy!

    Step by step process photos of making the ground beef filling with vegetables and cheese.

    🗓️ Make Ahead Tips

    The filling mixture can be prepared in advance and stored refrigerated in an airtight container but cut bell peppers only stay fresh for 2-3 days. If making the recipe ahead, plan to cook and eat within the 2-3 day time frame. 

    Stuff the peppers and store refrigerated until the day you plan to bake or grill them. Take the peppers out of the fridge and allow them to warm to room temperature before baking or grilling.

    Bell peppers stuffed with ground beef mixture in casserole dish garnished with fresh basil.

    🍽️ Recipe Adaptations

    The possibilities are endless when it comes to ingredient swaps and variations on the recipe. Here are some suggestions to experiment with!

    Flavors: Instead of Italian-style flavors, consider using keto taco meat for a Mexican-style stuffed pepper.

    Chili stuffed peppers: Stuff the peppers with leftover chili, like this no beans keto chili or keto chicken chili. 

    Breakfast: Crack an egg in it for breakfast stuffed peppers.

    Meat: Instead of ground beef, consider using different ground meats, like pork or chicken. Shredded beef, chicken, or pulled pork would all be fantastic. Mini meatloaf peppers are another fun idea to consider!

    Rice: Cauliflower is used to make stuffed peppers without rice, but other veggies would fit the bill. Chopped zucchini, mushrooms, or eggplant would make a tasty substitute or addition to the dish. Riced cabbage, broccoli, or parsnip would also be keto-friendly. Konjac-based shirataki rice is high in fiber and low in carbs, making it a suitable swap for keto recipes like this.

    A stuffed green bell pepper on a plate, ready to serve.

    📦 Storage and Freezing

    You can store leftover stuffed peppers refrigerated in an airtight container for up to 4 to 5 days. 

    The peppers can be frozen in an airtight freezer-safe container for up to 3 months. Consider storing peppers in batches for family meals or freezing peppers individually for single-serving meals.

    Casserole dish with keto stuffed peppers prepared from the recipe.

    🥗 Nutrition Information

    The final nutrition information will vary based on the type and size of bell peppers you choose and, of course, ingredient variation. The recipe uses medium-sized peppers, about 2 ½ inch diameter x 2 ¾ inch length, weighing approximately 119 grams.

    A serving size for this recipe is one topless stuffed pepper or two stuffed halves. Use whichever option is best to fit your macros and goals for the day. 

    The carbs in keto stuffed peppers are listed from least to greatest:

    Stuffed green bell peppers: 9.2g total carbs and only 6.3g net carbs per serving.

    Stuffed red bell peppers: 16.3g total carbs and 10.8g net carbs per serving.

    Stuffed yellow bell peppers: 16.7g total carbs and 12.6g net carbs per serving.

    The nutrition label in the interactive recipe card below represents the data for green bell peppers.

    In addition to being low in carbs, the recipe is also a tremendous source of micronutrients, especially vitamin C! The ingredients provide B vitamins, vitamin A, vitamin K, calcium, iron, selenium, and zinc. Keto can be delicious and nutritious!

    Nutrition facts labels for each of the green, red, and yellow stuffed pepper variations.

    ❓FAQ

    Are bell peppers keto friendly?

    Yes, bell peppers are low in carbohydrates and suitable for a ketogenic diet. 

    How many carbs in stuffed bell peppers?

    The carbs are often too high to work for a keto diet in recipes that use rice, breadcrumbs, and other high-carb ingredients. However, carbs in stuffed peppers without rice are much lower, only 6.3g net carbs per serving when using green peppers.

    Which bell pepper has the lowest carbs?

    Green bell peppers are lowest in carbs.

    Should I blanch or boil peppers before stuffing them?

    You can blanch or quickly boil the peppers if you prefer instead of microwaving, pre-baking, or pre-grilling. To do this, place the peppers in boiling water for up to 2 minutes, then set them in an ice bath to prevent overcooking. The goal of the pre-cook is to shorten the total time the peppers take to become tender, so the filling doesn’t dry out.

    How many net carbs are in green, red, and yellow peppers?

    Green bell peppers have 2.9g net carbs per 100g. [4.6g total carbs - 1.7g fiber = 2.9g net carbs]
    Red bell peppers have 3.9g net carbs per 100g. [6.0g total carbs - 2.1g fiber = 3.9g net carbs]
    Yellow bell peppers have 6.2g net carbs per 100g. [6.3g total carbs - 0.9g fiber = 6.2g net carbs]

    What can I substitute for rice in stuffed peppers?

    Low-carb vegetables make excellent rice substitutes in stuffed peppers. Cauliflower rice, hearts of palm, zucchini, mushrooms, eggplant, cabbage, broccoli, or parsnip are just a few ideas. Fibrous shirataki rice made with konjac flour is also an acceptable replacement.

    📖 Recipe

    Stuffed peppers in casserole dish.
    Print Recipe
    5 from 3 votes

    Keto Stuffed Bell Peppers without Rice

    A tried and true stuffed peppers recipe without rice, breadcrumbs or starchy fillers. Low carb and keto-friendly!
    Prep Time15 minutes mins
    Cook Time1 hour hr
    Total Time1 hour hr 15 minutes mins
    Course: Dinner
    Cuisine: American, Italian
    Diet: Diabetic, Gluten Free
    Keyword: baked, colorful, grilled, ground beef filling, keto friendly, vegetables
    Special Diet: Keto, Low Carb
    Servings: 6 peppers
    Calories: 269kcal
    Author: Tasha

    Equipment

    • Microwave
    • Stove
    • Oven
    • Grill

    Ingredients

    • 6 bell peppers medium, green, red, or yellow
    • 1 ½ lbs ground beef
    • ½ onion medium, diced
    • 2 cloves garlic minced or crushed
    • 1 tbsp tomato paste
    • 1 teaspoon Italian seasoning
    • ½ tsp black pepper ground
    • ¼ tsp salt
    • ¾ cup water
    • ¾ cup cauliflower rice fresh or frozen
    • 1 cup mozzarella cheese cubed (plus optional: grated or sliced topping)
    • 1 tsp fresh basil chopped, to garnish

    Instructions

    Bell pepper preparation

    • Slice the stemmed tops off of each bell pepper. As an alternative, halve the peppers lengthwise to make smaller portions. Hollow the bell peppers by scooping out the seeds and ribs. Discard the seeds and ribs, and store tops for use in other meals.
    • Pre-cook peppers using a microwave for the quickest option. Place peppers cut side down in a deep, microwave-safe dish. Fill the bottom of the container with ½-inch of water. Microwave for 5-6 minutes. Note: other pre-cook options include blanching, baking, or grilling and may require cook time adjustment for the final dish. To blanch, boil peppers for 2 minutes and place in an ice bath. In the oven, place cut-side down in a casserole dish with the bottom covered in water and top with foil; bake for 20 minutes at 425F. For the grill, place directly on oiled grates over medium-high heat for 6-7 minutes, flipping halfway through.

    The filling

    • If baking, preheat oven to 425 F. Prepare the grill if grilling.
    • Brown ground beef in a skillet over medium heat and break it down into smaller pieces as it cooks. Discard the excess fat and moisture that cooks off.
    • Add onion to the pan and cook until soft. Stir in garlic and cook until fragrant, about 1 minute. Add tomato paste, Italian seasoning, peppers, salt, and water to the pan and mix well. Bring the mixture to a boil, then drop to a simmer until water cooks off. Remove the pan from heat to allow the mixture to cool.
    • Stir in cauliflower rice. When the mixture has cooled, add in cheese cubes and mix well.
    • Fill the bell pepper shells with the meat and cheese mixture, about ¼ cup each. Place the peppers cut-side up in a casserole dish for baking or cast-iron pan for grilling.
    • Cover casserole dish in foil and place in preheated oven. Bake for 30 to 40 minutes at 425F, or until the peppers are tender enough to pierce with a fork. If grilling, place the cast-iron pan on the grill over indirect heat and cook for 30-40 minutes.
    • Top the cooked peppers with fresh basil to serve.

    Video

    Notes

    Nutrition information is based on a single serving and is provided as a convenience for Ketogasm readers. Data may vary based on brand and recipe variation.

    Nutrition

    Serving: 1pepper | Calories: 269kcal | Carbohydrates: 9.2g | Protein: 26.7g | Fat: 14g | Sodium: 312mg | Potassium: 567mg | Fiber: 2.9g | Sugar: 4.5g | Magnesium: 37mg | Net Carbs: 6.3g

    Keto Chili Con Carne

    May 27, 2021

    Bowl of chili garnished with avocado, cheese, and cilantro

    If you’re searching for a tried and true beanless chili recipe, look no further! This homemade no beans keto chili con carne with bacon and Rotel really hits the spot. Not only is it low-carb, but it’s also thick, hearty, and packed with savory flavor, making it an excellent keto comfort food. It’s also effortless and can be made in an Instant Pot pressure cooker, Crockpot slow cooker, or on the stovetop. 

    Chili con carne translates to “chili with meat” and can be prepared without beans without sacrificing flavor. By nixing the beans, you’re eliminating tons of carbs from the dish, making it automatically more keto-friendly. 

    Making homemade chili is foolproof. If you can brown meat, you can make chili. Simple as that! It’s also a much better option for ketogenic dieters. The canned, commercial options often contain soy flour, cornflour, sugar, and cornstarch. That means even if you snag a can of no beans chili con carne off the shelf, chances are it’s loaded with carbs. Choosing low-carb ingredients and excluding the flours, sugars, and starches helps keep the meal in line with a keto dietary pattern. 
    The style is akin to Texas chili or cowboy chili. Since there are no beans, it’s got a similar beef stew vibe that is lick-the-bowl delicious.

    [feast_advanced_jump_to]

    🥗 Ingredients

    To make keto chili con carne, you’ll need the following ingredients:

    • Bacon
    • Onion
    • Garlic cloves
    • Ground beef
    • Beef broth
    • Tomato paste
    • Chili powder
    • Cumin
    • Smoked Paprika
    • Black pepper
    • Salt
    • Rotel (Ro-Tel) diced tomatoes and green chilies

    The ingredients selected keep the carbohydrates low while maintaining the integrity of the expected flavors in the dish.

    Ingredients to make homemade chili without beans.

    🧪 Variations

    Thickeners

    You may have noticed the lack of sugars, flours, and starches typically found in commercially available chili in the list above. The purpose of these types of ingredients is less about flavor and more about ensuring a thicker texture. 

    While it isn’t necessary, you may want to add a keto-friendly thickening agent to achieve similar results. Guar gum and xanthan gum are popular additions to thicken and bind keto recipes. 

    To use guar gum, you’ll only need about ⅛ teaspoon whisked in with the beef broth. Sprinkle the guar gum over the liquid to prevent clumping and whisk vigorously. 

    To use xanthan gum, you’ll need about ⅛ teaspoon blended in with the beef broth. Xanthan gum clumps up almost immediately, so you will need to use an electric blender to effectively mix this instead of by hand. 

    Adding too much of either ingredient can lead to gummy or clumpy results, so be cautious about the total amount added to the dish.

    Meat 

    The recipe as written calls for ground beef and bacon, which is an undeniably killer combo. However, you can switch it up.

    You can swap ground beef with a ground protein of your choice. Ground pork, turkey, chicken, bison, venison, or lamb would make excellent substitutes that are all keto-friendly.

    Alternatively, you can combine multiple types of meat in the keto chili con carne, browning them together as you prepare the recipe. Try doing half and half ratios, such as one pound of ground beef and one pound of ground pork. That’s a tried and true meat combination from this tomatillo instant pot keto chili. 

    For the pork-free crowd, you can omit the bacon from the recipe. Just add your preferred cooking oil to the recipe to sauté the onion and garlic.

    Rotel

    If you don’t have Rotel (Ro-Tel), you can use any other canned diced tomatoes and chilies or dice up fresh chilies and tomatoes. Use two medium-sized tomatoes and small green chili pepper to replace one 10-ounce can.   

    Ro-Tel diced tomatoes and green chilies come in various spice levels and flavors––original, mild, hot, chipotle, and Mexican style. If you’re using Ro-Tel, select the spice level that best suits your palate.

    Full pot of chili with serving spoon.

    ⏩ Instant Pot

    Making Instant Pot keto chili is quick and simple, like pressing the fast-forward button on dinner. It’s an excellent option for an easy one-pot dinner when you’re in a hurry.

    Press the sauté button on the Instant Pot to heat the inner metal pot, then add chopped bacon and onion to the pan. Since the bacon releases fat as it cooks, this acts as the cooking oil. Add garlic to the pot and cook until it becomes fragrant.

    Add ground beef (or protein of choice) to the pot and break into smaller chunks as it browns.

    Once the beef has browned, use beef broth to deglaze the pot and scrape down any bits stuck to the pan.

    Now toss the rest of the ingredients in, give it a good mix, and seal the lid.

    Set the Instant Pot to “High Pressure” and adjust the time to 15 minutes. 

    When the alarm sounds, press the “Keep Warm” button and release the pressure manually or naturally. 

    To manually release, carefully turn the top knob from “sealing” to “venting” and watch out for the quick release of steam that vents. Allow the visible pressure valve to drop entirely before attempting to remove the lid.

    Natural release is when you let the Instant Pot cool down by itself and release steam slowly. When it’s done cooking, simply press the “Keep Warm” button and wait for the visible pressure valve to drop. This can take up to 30 minutes but gives the flavors additional time to develop. It tastes excellent and is worth the wait if you have extra time.

    Remove the lid, give it a final stir, and serve!

    Step-by-step instructions for chili con carne recipe in Instant Pot (IP).

    🥘 Crock-Pot or Slow Cooker

    Crockpot chili is a great “set it and forget it” option for entertaining, meal prepping, and busy days. To make keto chili in a crock-pot, you will need a large sauté pan in addition to the slow cooker. 

    Before adding anything to the crock-pot, the meat must be browned and the onion and garlic sauteed. Add the bacon and onion to a hot sauté pan, add garlic once onions become translucent, then add ground meat and break into small pieces.

    Once the meat has browned, transfer the meat mixture to the slow cooker, followed by the remaining ingredients. Stir everything together and top with the lid. 

    Turn the temperature knob to low or high, depending on how long you want to cook the chili. At low temp, the chili cooks for 6 to 8 hours. At high temp, the chili cooks for 4 to 6 hours.

    If needed, stir a small amount of water into the chili if it becomes thicker than you prefer.

    Once it’s finished cooking, simply turn the knob to “warm” until you’re ready to serve.

    Suppose you have an Instant Pot but prefer to slow cook. In that case, you can use the slow cooker function instead of the pressure option. Instead, press the slow cooker button. Select “normal” and cook for 6 to 8 hours or choose “high” for 4 to 6 hours.

    Collage of each step in the chili making process in a Crockpot slow cooker.

    🍲 Stove Top

    Making the recipe on the stovetop is a great option if you don’t have any specialized equipment. This is a simple one-pot meal that is ready in under an hour.

    For stovetop, using a stockpot or enameled cast iron pot works best. Avoid using regular cast iron as the acidic tomato ingredients aren’t good for the pan.

    Cook the bacon and onion over medium heat. Once onions are translucent, cook garlic until fragrant. Add the ground beef next. 

    Chop the meat into smaller pieces while browning, then deglaze the pot with beef broth once the meat is cooked.

    Add in the remaining ingredients, stir well, and bring to a boil.

    Reduce heat to low-medium and simmer covered for 30 to 40 minutes.

    Remove from heat, and it’s ready to serve for dinner.

    Collage of each step of the stovetop directions.

    🧊 Storage & Freezer

    The flavor is even better the next day, which means incredible leftovers for lunch and an excellent option for make-ahead meal prep, batch cooking, and freezer meals.

    In the fridge, the chili will last up to one week stored in an airtight container. Allow the chili to cool to room temperature before sealing in a container and placing it in the refrigerator.

    When ready to serve, reheat on the stovetop or in the microwave until warm, about 1 minute per serving, mixing periodically.

    Alternatively, transfer refrigerated chili to a freezer container to extend the shelf life if unable to eat within the week it was cooked.

    In the freezer, it will last up to 6 months in a freezer-safe storage container. If freezing directly after cooking, allow the chili to cool to room temperature before sealing it in a freezer-safe container and placing it in the freezer. 

    On the day you plan to serve, thaw the frozen chili in the fridge. Reheating can be a job for the microwave, stovetop, or oven (400 degrees) depending on the storage container, about 1-2 minutes per serving. 

    💭 Top tip

    Storing the keto chili con carne in the refrigerator overnight gives the flavors even more time to develop. Honestly, it tastes just as good a week later from Tupperware as it does hot out of the pot.

    Consider doubling the recipe to have enough to freeze for an effortless make-ahead dinner. Or serve the first half to the family for dinner and the second half to pack lunches all week. No one will complain about this meal on repeat. It’s that delicious!

    Keto chili con carne with avocado slices, cilantro, green onion, and cheese toppings.

    👪 Serving Size

    The recipe yields six 1 cup servings, but you can scale it up or down in the interactive recipe card below. 

    There are only 5 net carbs for each 1 cup serving size.

    When ready to serve, garnish with your favorite keto-friendly toppings or mix-ins to really kick it up a notch––avocado, sour cream, crema, green onions or scallions, diced red onions, cilantro, any kind of crumbled or grated cheese, sliced jalapeño, nutritional yeast, hot sauce, you name it.  

    Set up a chili bar for your family and friends with prepared dishes of the various garnishes so they can pick and choose their favorites. (#bestmomever)

    Two bowls of chili near garlic cloves and lime

    🍽️ Equipment

    Instant Pot - An electric pressure cooker that totally lives up to the hype. 

    Crockpot - If slow and low is the way to go, you’ll need one of these.

    Enameled cast iron dutch oven - The ease of cooking with cast iron with extra protection against acidic ingredients. Plus, clean-up is a breeze!

    Meat chopper - Not totally necessary but can be a game-changer for breaking meat into smaller pieces while browning. Quickly break down meat into smaller chunks without damaging your lovely pans.

    🥑 More keto recipes

    If you like chili, then you’re going to love these other keto-friendly recipes:

    Shredded Chicken Chili

    Tomatillo Chili in Pressure Cooker

    Low Carb Hand Pies Stuffed with Chili

    Keto Chili Dog Pot Pie Casserole

    Low Carb Chili Mac

    ❓FAQ

    Hands holding a bowl of garnished chili
    How many carbs are in a bowl of chili?

    In just one cup of traditional canned chili with beans, there are 33.89g of total carbs. 

    In a commercial no bean chili con carne, there are 19g total and 16g net carbs per cup. 

    This will vary by brand and actual serving size. However, the carbs in a bowl of commercially prepared chili are generally a bit high for someone doing the standard keto diet due to the beans and high-carb additives.

    Carbs in chili look a little different from a homemade perspective. As written, a serving (~1 cup) of this keto chili recipe has just 5g net carbs and a total carb count of 7.4g. 

    In fact, the entire recipe—the WHOLE pot of chili—has approximately 44g total carbs and 30g net. Not too shabby! That's around the carb load of what you'd be getting in only a cup of canned chili with beans. 

    When it comes to keto chili con carne, homemade definitely wins.

    What is a good substitution for beans in chili?

    A good substitution for beans in chili includes harder, non-starchy vegetables that soften up as the chili cooks to simulate the texture of cooked chili beans. Pieces of cauliflower, chayote, radishes, celery, or turnips would all be fantastic bean swaps for keto chili!

    Are there any beans that are keto-friendly?

    Green beans and soybeans are relatively low in carbs compared to other beans, making them one of the few keto-friendly bean options. 

    Black soybeans would be a good keto option if you prefer a keto chili with beans. These legumes have a substantially lower carbohydrate count than the traditional kidney bean and are very high in fiber. 

    In a half cup of canned black soybeans, total carbs are 8g, and fiber is 7g—a net carb count of just 1g! This certainly isn't a bad option if you include soy in your diet.

    📖 Recipe

    Bowl of chili garnished with avocado, cheese, and cilantro
    Print Recipe
    5 from 2 votes

    No Beans Keto Chili Con Carne

    Ditch the beans and level up your chili game with this delicious no bean keto chili recipe! Instructions included for Instant Pot, Crockpot slow cooker, and stovetop.
    Prep Time10 minutes mins
    Cook Time50 minutes mins
    Slow Cooker6 hours hrs
    Total Time1 hour hr
    Course: Dinner, Lunch, Main Course, Meal Prep, Soup
    Cuisine: American
    Keyword: bacon, beef, chili, crockpot, slow cooker, tomato
    Special Diet: Dairy-Free, Gluten-Free, Keto, Low Carb
    Servings: 6 cups
    Calories: 400kcal
    Author: Tasha

    Ingredients

    • 6 strips bacon cut to ¼-inch strips
    • ½ onion medium, chopped or diced
    • 2 cloves garlic minced or crushed
    • 2 lbs ground beef
    • 1 ⅓ cups beef broth
    • ¼ cup tomato paste
    • 2 Tbsp chili powder
    • 1 Tbsp cumin ground
    • 1 Tbsp smoked paprika
    • 1 tsp black pepper ground
    • ½ tsp salt or to taste
    • 10 oz Rotel diced tomatoes and chilies or canned/fresh diced tomatoes and chilies
    US Customary - Metric

    Instructions

    Prep Work

    • Prepare onion and bacon for cooking. Remove thin papery outer layers of onion and chop or dice on a cutting board.
    • Cut bacon into small, ¼-inch thick strips.
    • Use a garlic press to crush garlic cloves or finely mince with a knife.

    Instant Pot Instructions

    • Plug the Instant Pot in and remove the lid. Press the sauté button to heat the stainless steel inner cooking pot.
    • Add bacon and onions to the heated pot, stirring frequently to prevent burning. Cook until the onions become translucent. Mix in garlic and cook until it becomes fragrant, about 1 minute.
    • Add ground beef (or protein of choice) to the pot to brown. Use a meat chopper tool or spatula to break the beef into smaller pieces as it browns. Continue cooking until there is no visible pink remaining in the ground beef.
    • Pour beef broth into the pot and scrape down any food particles that are stuck to the inner sides or bottom of the pot. Stir to incorporate these bits into the meat mixture.
    • Add in tomato paste, chili powder, cumin, smoked paprika, pepper, salt, and Rotel (or diced tomatoes and chilies).
    • Mix well, then seal the lid. Ensure the knob on lid is set to "sealing" and not "venting."
    • Press the "Manual" button and adjust the cook time to 15 minutes using the +/- buttons to change the default setting. Ensure the Instant Pot is set to "High Pressure.". The device will take several minutes to build up to pressure before the cook time countdown begins. The float valve on the lid near the sealing/venting knob will pop up when the device has reached pressure.
    • When the alarm sounds, press the "Keep Warm" button. Allow the pressure to release naturally or manually. For natural release, allow the Instant Pot to cool by itself and wait for the float valve to drop before removing the lid, about 20 to 30 minutes. For manual release, carefully turn the top knob from "sealing" to "venting" and avoid vented steam. Allow float valve to drop completely before attempting to remove the lid.
    • Remove the lid and stir well before serving. Serve immediately or package for storage in refrigerator or freezer after cooling to room temperature.

    Crockpot or Slow Cooker Instructions

    • In a large, deep sauté pan, cook bacon and onion over medium heat until onion is translucent. Incorporate garlic into mixture and cook until fragrant, about 1 minute. Add ground beef and break into smaller pieces as it browns with a spatula or other utensil.
    • When ground beef has browned and no visible pink remains, pour beef broth into the pan and scrape down any food bits stuck to the sides or bottom of pan.
    • Transfer meat mixture to crockpot or slow cooker and add the remaining ingredients–tomato paste, chili powder, cumin, smoked paprika, pepper, salt, and Rotel (or diced tomatoes and green chilies). Mix well and secure lid on crockpot.
    • Ensure the crockpot is plugged in. Adjust the cook settings to low temperature and cook for 6 to 8 hours. Alternatively, set to high temperature and cook for 4 to 6 hours. Set an alarm reminder if needed. If chili becomes too thick as it cooks, add in a small amount of water and mix well.
    • When chili has finished cooking, mix well and set the temperature to "warm" until ready to serve. If storing for later, allow to cool to room temperature for refrigerated or freezer packaging.

    Stovetop Instructions

    • Heat a large stockpot or enameled cast iron pot on the stovetop over medium heat. Add bacon and onions, stir occasionally to prevent burning. When onions are translucent, mix in garlic and cook until fragrant.
    • Add ground beef to pot and break into small pieces as it cooks. When meat has browned with no visible pink remaining, add beef broth to pan to deglaze the pan, and scrape the sides and bottom to remove and incorporate stuck food particles.
    • Add tomato paste, chili powder, cumin, smoked paprika, cumin, black pepper, salt, and Rotel (or diced tomatoes and green chilies). Combine well and bring the mixture to a boil.
    • Reduce heat to low-medium and simmer covered with lid for 30 to 40 minutes, stirring occasionally to prevent burning. Stir in a small amount of water if mixture becomes too thick while cooking.
    • Remove from heat and serve immediately or package for storage in refrigerator or freezer after cooling to room temperature.

    Garnish (optional)

    • Add additional salt and pepper to taste. Garnish with your favorite keto-friendly toppings or mix-ins. Suggested garnishes include avocado slices, crumbled or grated cheese, hot sauce, sour cream, chopped cilantro, diced red onions, green onions or scallions, or nutritional yeast.

    Video

    Notes

    Nutrition information is based on a single serving and is provided as a convenience for Ketogasm readers. Data may vary based on brand and recipe variation. Click here for  more detailed nutrition information. 

    Nutrition

    Serving: 1cup (241g) | Calories: 400kcal | Carbohydrates: 7.4g | Protein: 43.3g | Fat: 20.3g | Sodium: 646mg | Potassium: 742mg | Fiber: 2.4g | Sugar: 3.1g | Magnesium: 47.7mg | Net Carbs: 5g
    • Go to page 1
    • Go to page 2
    • Go to page 3
    • Interim pages omitted …
    • Go to page 36
    • Go to Next Page »

    Primary Sidebar

    About Ketogasm

    Welcome to Ketogasm! Here you will find keto-friendly recipes, meal plans, and nutrition resources to help simplify ketogenic diet and lifestyle changes.

    More About The Site →

    Stay connected

    • Facebook
    • Instagram
    • Pinterest
    • YouTube
    • RSS Feed

    Featured in

    Ketogasm has been featured in these sites

    Trending Recipes

    • Stuffed peppers in casserole dish.
      Easy Keto Stuffed Bell Peppers without Rice
    • tablespoon scooping taco seasoning from mason jar
      Sugar-free Keto Taco Seasoning Mix
    • Bowl of chili garnished with avocado, cheese, and cilantro
      Keto Chili Con Carne
    • Keto Smoothie Recipe
      Keto Smoothie Recipe (Low Carb, Sugar-Free)
    • Keto Fried Chicken Recipe Baked in Oven - No Carb Chicken, Gluten Free, Dairy Free
      Keto Fried Chicken Recipe Baked in Oven
    • Creamy Garlic Chicken Soup [Recipe]
      Creamy Garlic Chicken Soup [Recipe]

    Keto Spring Salads

    • Keto tuna salad
      Keto Tuna Salad with Avocado (No Mayo!)
    • Keto Broccoli Salad
      Keto Broccoli Salad Recipe [Low Carb, Gluten Free]
    • Easy Keto Lunch Idea
      Shrimp Salad in Avocado Boats [Low Carb, Keto]
    • Cold Sesame Cucumber Noodle Salad [Recipe]
    • Pouring salad dressing over kale salad in bowl.
      Keto Kale Salad with Avocado, Chicken, & Lemon Dressing
    • Keto Egg Salad
      Keto Egg Salad [Low Carb, Gluten Free]

    All the best keto recipes in one spot – get the free Keto App

    Keto Diet icon

    Footer

    Featured Favorites

    tablespoon scooping taco seasoning from mason jar
    Low Carb Smoothies
    Keto Fajitas
    Keto alfredo sauce
    Keto tuna salad
    Keto Zucchini Bread
    Cauliflower Fried Rice
    Keto No Bake Cookies

    · Copyright Ketogasm © 2023 ·